
I measure the run, add about an inch of slack, then cut the jacket cleanly with a utility knife, scoring and slicing without tearing the copper. I strip roughly 0.5 in (12 mm) of insulation using a 10‑gauge‑rated stripper, adjust pressure for PVC or rubber, and twist the strands into a tight 0.5 mm rope so they act like a single conductor. I insert the rope into a spring‑loaded clamp or banana plug, optionally solder a bead for extra grip, tighten to ~2 Nm, and finish with heat‑shrink for moisture protection; a quick continuity test will confirm polarity before I power up, and if you keep going you’ll discover even more details.
Key Takeaways
- Measure and route cable, leaving ~1 inch slack, then cut and score the jacket cleanly to avoid nicking strands.
- Strip 0.5 in of insulation with a gauge‑appropriate stripper, ensuring a smooth edge and no damaged wires.
- Twist stripped strands into a compact rope (~0.5 mm) for a solid, low‑resistance connection before termination.
- Insert the twisted wire into a spring‑loaded clamp or crimped banana plug, optionally soldering a bead, and tighten to ~2 Nm.
- Verify continuity and polarity with a multimeter, confirming <0.5 Ω resistance and correct positive/negative labeling before powering on.
Measure Speaker Cable Length & Add Slack
Ever tried to run speaker cable across a room and ended up pulling on the plugs? It’s a pain, especially when you discover the length was off by a foot. Here’s a quick way to get it right without any guesswork.
First, walk around the space and note where each driver sits. Corners and bookshelf setups can add a few extra feet you might miss if you just measure straight across. Lay the cable along the exact route you plan to use—along walls, under carpet, or behind baseboards. Pull the tape tight, write down the number, and then add about an inch of slack. That little extra gives you room to bend the cable without stressing the connections.
Try this:
- Measure from the amp to the speaker, then add one inch for flexibility.
- Keep the cable loose enough to make neat bends, but not so loose it sags.
That extra inch stops tension when you tweak the speaker angle later on. It also helps keep the conductors from strain, which means a cleaner signal and a tidy install.
Frankly, the most common mistake is forgetting the little turns around furniture or the slight dip under a rug. Those tiny detours add up quickly. By tracing the exact path first, you avoid surprises and keep everything looking neat.

If you follow these steps, you’ll end up with a solid, low‑stress connection that looks as good as it sounds. Ready to give your setup a smoother look?
Recommended Products

[CONVENIENCE]- Answer and view callers at your door remotely via your mobile iOS or Android device, whether you are at home or abroad. The smart video doorbell intercom system sends a push-notification to your smart phones and you could watch, talk and remotely unlock your gate through your smart mobile devices. Never miss a delivery or visitor again.

Bright ideal for a variety of lighting conditions, the projector has 2,500 lumens of equal color and white brightness (1)
Widescreen HD entertainment up to 300" - life-sized images up to 25x larger than a 60" flat panel, on virtually any blank wall or screen.

As an affiliate, we earn on qualifying purchases.
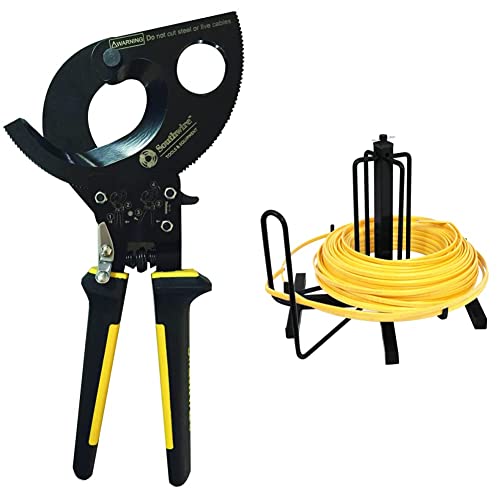
Cut Speaker Cable Jacket Cleanly
Ever tried to strip a speaker cable and ended up with frayed ends that snag the copper? It’s frustrating, especially when you’re in a hurry. A clean 2‑mm cut (about 1/16‑inch) makes the difference between a smooth job and a messy redo.
Grab a sharp pair of wire cutters and slice the outer jacket cleanly. A precise cut keeps the edges from tearing, so the copper strands stay intact and you won’t waste time re‑stripping later. I always start by scoring the jacket lightly with a utility knife—this is called jacket scoring. The score line shows exactly where the cutter should bite, keeping the cut straight and uniform.
When the blade meets the scored groove, it slides in with minimal force, leaving a neat edge that protects the strands. This method saves a few seconds per connection, which adds up in a full‑system install.
Worth knowing:
- Use a utility knife to make a shallow score line before cutting.
- Hold the cutter at a steady angle to follow the score.
Try this:
- After scoring, press the cutter just enough to bite the groove—don’t force it.
- Check the cut with a quick visual; the edge should be smooth, not ragged.
The result? Clean cuts that separate the insulation without nicking the copper, and a faster stripping step afterward. You’ll notice the difference the first time you finish a bundle of connections.

Give it a try on your next project and see how much smoother the whole process feels. Ready to make your cable work a little easier?
Recommended Products
DURABLE ratcheting cable cutters perfect for cutting up to 750 kcmil copper and 1000 kcmil aluminum cables. Includes 2-brackets to mount the cable dispenser to floor or stud.

Precision & Power: The Southwire Cable Cutter Tool delivers clean cuts on copper and aluminum cables with a ratcheting cable cutter design for fewer strokes and better control

Ideal for removing cable jackets and insulation
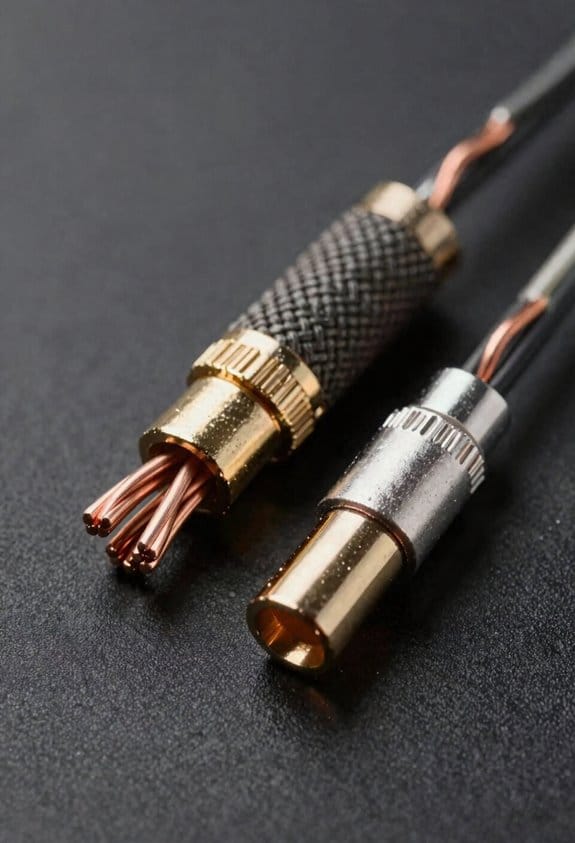
Strip Speaker Cable Insulation for Half‑Inch Bare Wire
Ever tried to strip a half‑inch of bare wire and ended up with frayed ends that could short out your system? You’re not alone—most home‑theater cables sit between 12 AWG and 16 AWG, so picking a stripper that handles up to 10 gauge gives you a safe margin. The right notch lets the blades bite just deep enough to open the insulation without nicking the copper strands, leaving a clean, uniform exposure that slides easily into terminals or banana plugs.
Frankly, the first thing to do is check the insulation material. PVC and rubber blends behave differently, so you’ll need to adjust the pressure a bit. A gentle squeeze and a quarter‑turn rotation pull the cover cleanly, exposing exactly 0.5 inches of copper. That length lets the connector grip firmly and keeps stray sparks at bay.
Worth knowing: if you’re working with a tougher jacket, a little extra torque won’t hurt, but don’t over‑squeeze or you’ll damage the strands. A quick visual check after each cut helps you catch any nicked wires before they become a problem.
Here’s the trick: line up the notch with the cable, squeeze just enough to feel the blades bite, then give it a smooth quarter‑turn. The insulation should pop off in one clean motion, leaving a neat strip that’s ready for the plug.
If you’re still unsure about the gauge, remember that a tool rated a couple sizes larger than your wire is always safer. It gives you a little wiggle room and reduces the chance of cutting into the copper.
Try this: after stripping, give the bare wire a gentle twist to make sure the strands are still together. That quick step can prevent a loose connection that might cause signal loss later on.
Do you ever wonder why some strips look messy while others are flawless? The secret is in the tool’s fit and a steady hand. With the right stripper and a bit of practice, you’ll get a clean cut every time.
Give it a go and see how much smoother your setup runs. Ready to ditch the frayed ends for good?
Recommended Products

Lightweight Hard Case : The tools are conveniently secured in place in a lightweight yet durable, high-quality portable case that is perfect for home, office, or even outdoor use. The user’s manual makes it easy to use by professionals and amateurs alike. No more fumbling around looking for the tools that you need

What's in the Box: Ultrasonic Insert with O-Rings, 1 inch PVC Tee, Owner's Manual

In a tanos mini-systainer (solid plastic box)
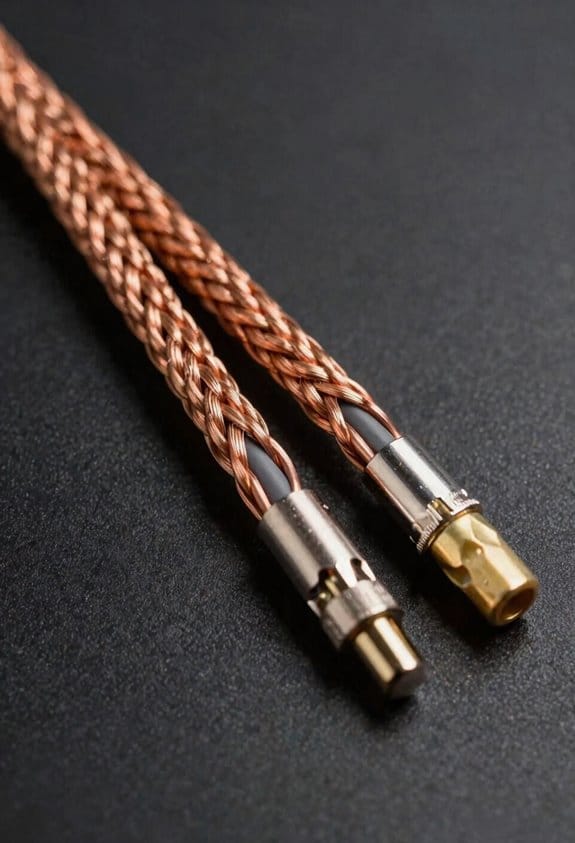
Inspect and Twist Speaker Cable Strands
Ever had a speaker cable that just won’t stay solid, and you hear that annoying buzz?
Once you’ve stripped about half an inch of copper, give the strands a quick look and a firm twist. A tidy bundle keeps the connection solid and stops stray strands from shorting the amp. A tight twist also cuts resistance—roughly 0.1 Ω per foot compared with loose strands—so you get cleaner sound and less heat at the terminals.
Check each strand for continuity. Make sure no copper is nicked or broken, because any weak link can cause clicks or dropouts. A firm twist compresses the strands, lowering inter‑strand capacitance that can mute the highs. Pull the wires together until they feel like a single, compact rope, about 0.5 mm in diameter, then give a gentle tug to confirm they won’t unwind.
Worth knowing:
- Twist until the bundle feels like a solid rope, not a bunch of loose threads.
- Give it a light pull; if it stays together, you’re good to go.
Try this:
- After twisting, double‑check continuity with a multimeter.
- If any strand looks frayed, trim it off before you finish the twist.
Doing this simple step gives you a low‑impedance path and keeps the amp happy. You’ll notice a smoother tone and less heat buildup at the terminals.
Feel the difference next time you plug in—your ears will thank you.
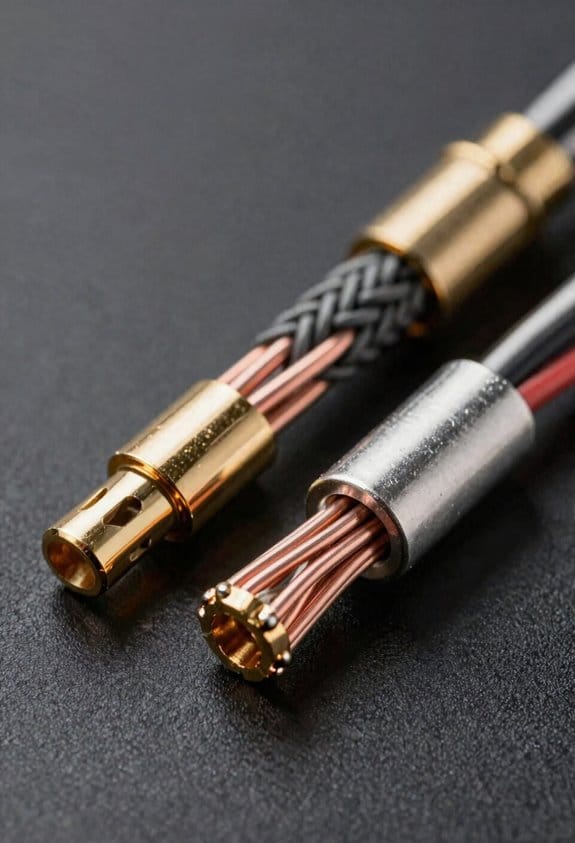
Terminate Speaker Cable With Terminals or Banana Plugs
Having a speaker that crackles or a receiver that overheats is a real pain, especially when you’re just trying to enjoy a movie night. The trick is getting a solid connection between your cable and the terminal or banana plug.
First, strip about 6 mm (¼ inch) of insulation off the wire. Twist the strands into a tight rope roughly 0.5 mm thick – that little rope makes a low‑resistance link that keeps the amp cool and cuts out buzz. Then push the wire into the plug’s spring‑loaded clamp or the banana’s crimped barrel; it holds the wire firmly so the connection won’t loosen when you move the speaker.
Frankly, check the plug size before you buy. A 4 mm‑diameter banana fits most home‑theater receivers, while a 5 mm one can get stuck. If you want extra security, heat the copper until it glows and feed a tiny bead of solder onto the strands. The solder locks everything in place, dropping resistance to under 0.02 Ω and stopping those annoying clicks when you crank the volume.
Here’s the trick: when you’re swapping cables later, you’ll find the soldered joint makes the job painless. No need to re‑strip or re‑twist; just pull the old plug out and slide the new one in.
Worth knowing: a good connection not only sounds better, it also protects your gear from overheating. So, next time you set up a speaker, give the cable a quick twist and a snug fit – you’ll notice the difference right away.
Got any other speaker‑setup tips you swear by?
Recommended Products

Hifi Speakers Floor Standing: Take your sound to the next level with Q Acoustics 3050i floor standing speakers. 22mm decoupled high frequency drivers with wide surround create a wide even dispersion of stereo, and P2P bracing reduces intrusive cabinet vibrations for a purer sound.

Hifi Speakers Floor Standing: Take your sound to the next level with Q Acoustics 3050i floor standing speakers. 22mm decoupled high frequency drivers with wide surround create a wide even dispersion of stereo, and P2P bracing reduces intrusive cabinet vibrations for a purer sound.

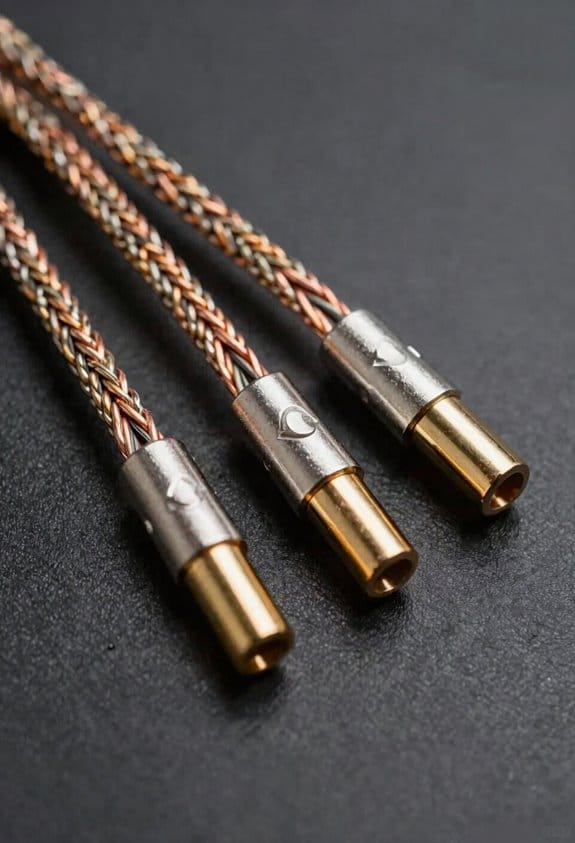
“WBC – Ultimate Assembly Range” is a direct result of popular demand by our valued customers, which takes our already excellent cable solutions a step further. With an industry-leading total of 4480, 99.99% Ultra-Pure Oxygen Free Copper (OFC), 0.08mm ultra-fine strands, this heavy gauge cable will effortlessly deliver deeper lows, sweet mids and higher highs without any fear of signal loss. Satisfying all the most stringent requirements of the most demanding audiophile.
Test Speaker Cable Polarity Before Power‑On
Ever had a speaker sound like it’s talking through a wall? A quick polarity check can save you from a muffled mess and protect your amp’s output stage.
Grab a multimeter, set it to continuity, and touch one probe to the speaker’s positive terminal while the other contacts the wire’s exposed tip. A beep means the link is solid. Do the same on the negative side. If the beeps cross, the phase is off—swap the leads or relabel the wires so the speakers stay in sync.
A 0.5 Ω resistance reading tells you the connection is tight. That tiny check catches loose contacts before they turn into big headaches. It’s a simple step that keeps your stereo imaging crisp and your amp happy.
Try this:
- Verify continuity on both positive and negative terminals.
- Look for a clean beep on each side; no cross‑talk.
Worth knowing: A quick resistance check can spot bad solder joints or frayed wires that might otherwise cause distortion.
Doing this before you flip the power switch means you won’t waste time troubleshooting later. Your ears will thank you, and your gear will stay safe. Ready to give your setup a solid foundation?
Double‑Check Connections & Secure All Ends
Ever had a perfect sound setup turn into a hiss‑filled nightmare because a loose screw or a frayed tip slipped in? I’ve been there, and the fix is simpler than you think.
First, double‑check every connection. A 0.5 mm gap at the terminal can steal up to 10 % of your power and add unwanted noise, especially when the amp pushes 2 A per channel. Tighten each terminal screw to about 2 Nm – that’s firm enough without stripping the threads. Then, slide a piece of heatshrink over each splice and heat it so you get a moisture‑proof seal that also dampens vibration‑induced micro‑breaks.
Worth knowing:
- Label each connector with a bright tag. It saves you from swapping positives and negatives later on.
- Use a 3 mm heatshrink overlap on every splice. That extra length protects against accidental pulls when you move the speakers around.
I also make a habit of checking the ends after any move. A quick visual once for a loose screw or a frayed tip can catch problems before they turn into a hiss. And when you’re tightening, give the screw a gentle turn until you feel resistance – that’s your cue it’s snug.
Frankly, the little details add up. A solid connection means your system stays quiet and reliable, even after you shuffle gear around the room.
You’ll notice a cleaner sound and fewer surprises. Ready to tighten up your setup?
Recommended Products

Included Items: Pure Copper Cable (select cable gauge, insulation color and length using the selection tabs) + 5pcs 5/16" STUD Copper Cable Lugs + 5pcs 3/8" STUD Copper Cable Lugs + 3 Feet Black Heat Shrink Tubing. Save time and money by purchasing all components in one product listing.
Includes 4/0 AWG Pure Copper Cable + 10pcs 4/0 AWG Copper Cable Lugs + 3 Feet Black Heat Shrink Tubing. Save time and money by purchasing all components in one product listing.

Included Items: 4/0 AWG 10 ft red & 10 ft black pure welding copper cable (select cable gauge, insulation color and length using the selection tabs) + 5pcs 5/16" STUD Copper Cable Lugs + 5pcs 3/8" STUD Copper Cable Lugs + 5PCS Black& 5PCS Red 25.4mm Heat Shrink Tubing. Save time and money by purchasing all components in one product listing.
Frequently Asked Questions
How Do I Choose the Correct Wire Gauge for My Speakers?
I pick the gauge by matching speaker impedance to amp power handling—lower‑impedance, high‑power speakers need thicker (lower‑gauge) wire to avoid loss, while higher‑impedance, low‑power setups can use thinner gauge.
Can I Use a Soldering Iron Instead of Banana Plugs?
I say you can use a soldering iron as a solder alternative, but keep the heat low and work quickly to avoid heat damage prevention, ensuring the copper stays intact and the connection stays solid.
What’s the Best Way to Protect Cables From Electromagnetic Interference?
I treat EMI like rain on a tin roof—shielded cables and ferrite beads are my waterproofing. I wrap the conductors, clip beads near connectors, and keep everything tightly grounded for clean sound.
How Often Should I Replace or Re‑Terminate Speaker Cables?
I replace or re‑terminate my speaker cables whenever I notice connection corrosion, typically during an annual inspection; otherwise, I leave them alone until wear or signal loss becomes evident.
Is It Safe to Run Speaker Wires Through Walls Without a Conduit?
I say it’s fine if the wires are fire‑rated and meet code compliance, but picture them as guarded travelers—only, you’re conduit‑like pathways that respect fire rating considerations, preventing hidden hazards.


