I start with 12‑AWG for runs over 15 ft or 13‑AWG for shorter spans, because the thicker copper keeps resistance low, preserves bass tightness, and stays cool; I choose a gold‑plated banana plug with a 5 mm inner chamber, which lets the stripped strands sit comfortably without bending, and I strip about 12 mm (½ in) of insulation using the 12‑AWG notch on my stripper to avoid nicking. After twisting the fibers, I fold the wire in half, fan the strands so each contacts the plug interior, and pull the plug snugly onto the binding post, then tighten the set screw about half a turn past snug to roughly 0.5 Nm, which gives a firm grip without crushing the copper. Finally I check the 8 Ω load with a multimeter and listen for hum; if everything’s tight, the sound will be crisp and you’ll be ready to explore the next steps.
Key Takeaways
- Strip ~12 mm of insulation from the 12‑AWG/13‑AWG wire using the proper gauge notch, then twist strands tightly.
- Fold the stripped wire in half to increase contact surface, leaving 3–5 mm protruding after insertion.
- Insert the folded wire into a 5 mm‑diameter banana‑plug chamber, ensuring all strands fan out and seat fully.
- Tighten the set screw about half a turn past snug, applying ≥0.5 Nm torque without crushing the copper.
- Verify polarity, perform a tug test, and check 8 Ω impedance with a multimeter before powering the system.
Select the Right Heavy‑Gauge Speaker Wire for Banana Plugs
Ever tried to hook up a new receiver and found the speaker wire a mess? You’re not alone—picking the right heavy‑gauge wire can feel like a puzzle, but it doesn’t have to be.
The gauge you choose should match the amp’s power and how far the speakers sit. For a 100‑watt receiver feeding floor‑standing cabinets 15‑20 feet away, a 12‑AWG works well; if the run is shorter, 13‑AWG is fine too. Thicker wire cuts resistance, keeps the bass tight, and stops heat from building up.
-ly, check how flexible the cable is. A stiff bundle can snag on tight bends, while a pliable strand slides easily into banana plugs without nicking the conductor. Most cables use copper because it’s cheap and has low resistivity, but some premium options add a silver‑plated layer for a little extra conductivity.
Worth knowing:
- 12‑AWG copper gives clear mids and punchy lows over longer runs.
- 13‑AWG still sounds great for shorter spans and is a bit easier to bend.
When you’re installing, make sure the wire slides into the banana plugs smoothly—no fighting with the connector. A good fit means you won’t have to wrestle with the plug later, and the connection stays solid.

If you’ve ever wondered why some setups sound dull, it’s often the wire. A thicker, flexible copper run can make a noticeable difference in tight and overall clarity.
Give it a try and see how the right gauge changes your listening experience. Got a favorite brand of speaker wire you swear by?
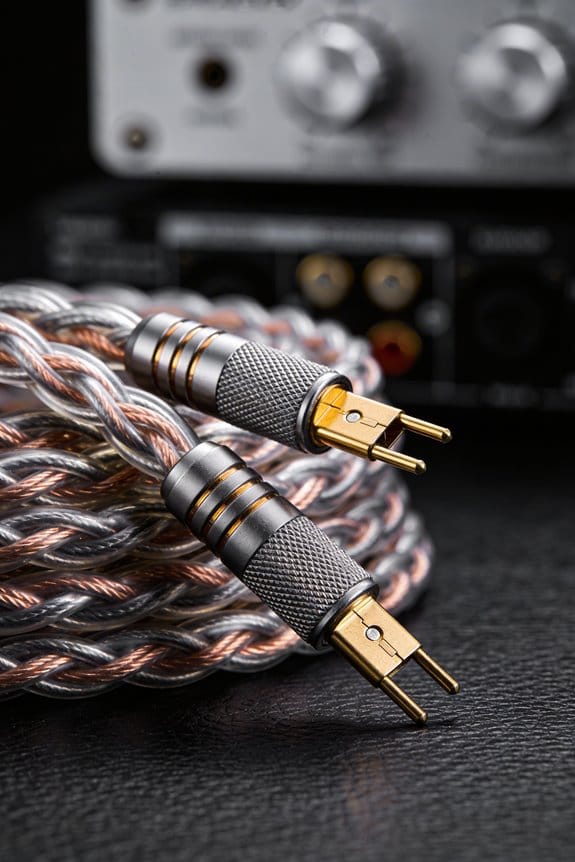
Choose the Proper Banana Plug for Heavy‑Gauge Wire
Ever tried to jam a thick speaker cable into a tiny banana plug and felt the copper bite back? That squeal of resistance is a sign you’re using the wrong size. The trick is to match the plug’s bore diameter to your wire gauge. Most 12‑AWG or 13‑AWG cables need an opening of about 4 mm to 5 mm, so a plug with a 5 mm inner chamber lets the stripped strands sit comfortably without forcing the copper to bend. When the copper stays straight, the resistance drops and the connection feels tighter and more reliable.
Worth knowing:
- Look for a 5 mm inner chamber for 12‑AWG/13‑AWG wire.
- Choose gold‑plated contacts; they resist oxidation and stay clean, even in humid rooms.
If your speaker posts are tucked behind a wall or sit in a tight spot, an angled banana plug can be a lifesaver. The bend lets the wire enter without straining the screw, which cuts down the chance of a loose fit and makes the whole setup feel solid and professional. I always pick gold‑plated plugs for durability, because the coating keeps the connection clean over time.
Frankly, you don’t need a fancy brand to get a good fit—just check the inner diameter and the plating. A plug that forces the wire to bend will wear out faster and may even cause a crackling sound in your speakers. When the wire sits loosely, you risk intermittent connections that can ruin movie nights or gaming sessions.
Try this: strip the speaker wire just enough to expose the strands, slide them into the plug, and give a gentle tug. If the copper slides in without bending, you’ve got the right size. If you have to force it, look for a plug with a larger bore. A snug, strain‑free fit means lower resistance and a longer‑lasting link between your amp and speakers.

A quick visual check can save you a lot of hassle. When you unscrew the plug, the inner chamber should look spacious enough for the strands to sit without crowding. If the wires look cramped, it’s a sign to upgrade to a bigger bore. This simple step helps keep the signal clean and the connection solid.
In the end, the right banana plug is a small detail that makes a big difference in sound quality and reliability. Have you found a plug that works perfectly for your setup? Give it a try and see how much smoother your audio runs.
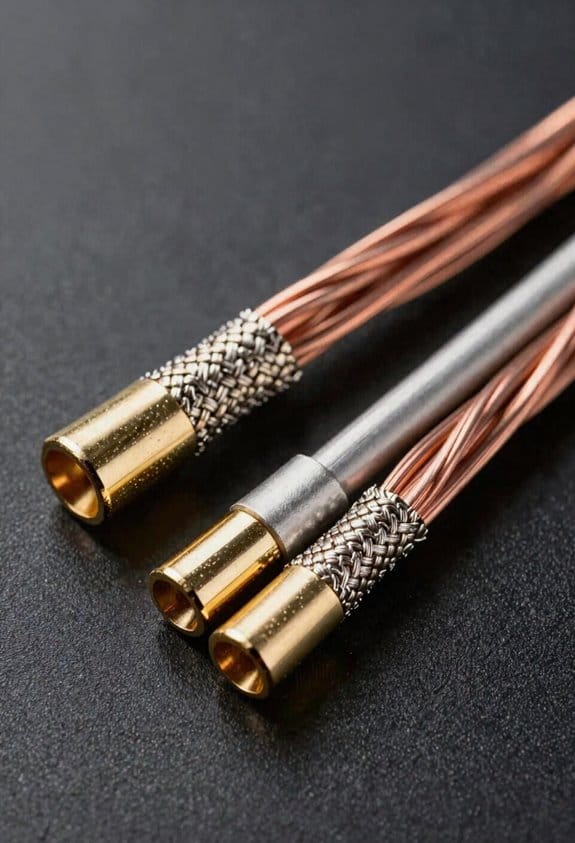
Strip and Prepare Heavy‑Gauge Wire for Banana Plugs
Ever tried to get a 12‑AWG cable into a banana plug and ended up with a mess of frayed strands? You’re not alone—getting that heavy‑gauge wire to sit cleanly inside the plug takes a bit of care, but it’s worth it for a solid connection.
First, measure about 12 mm (½ inch) of insulation off each end. That length gives enough copper to make a good contact without leaving too much slack that could snag later. Grab a wire stripper set to the 12‑AWG notch and pull the insulation off in one smooth motion. Keep an eye out for any nicked strands; a clean pull keeps the copper intact.
After you’ve stripped the wire, give the exposed fibers a tight twist. Then fold the wire in half so the strand count doubles—this bumps up the contact surface and cuts down resistance. When you’re done, check the polarity: match the red wire to the red plug and the black to the black. That little step saves you a headache when you insert the plug later.
Worth knowing: a quick double‑check of the stripped length helps you avoid a loose fit. If the stripped part is too long, trim a bit off; if it’s too short, you might need to strip a little more. Either way, you’ll end up with a neat, snug fit that stays in place.
Frankly, the whole process takes just a few minutes, but it makes a big difference in how your setup performs. Give it a try and see how much smoother your connections become.
Got any other tips for handling heavy‑gauge wire? Let me know!
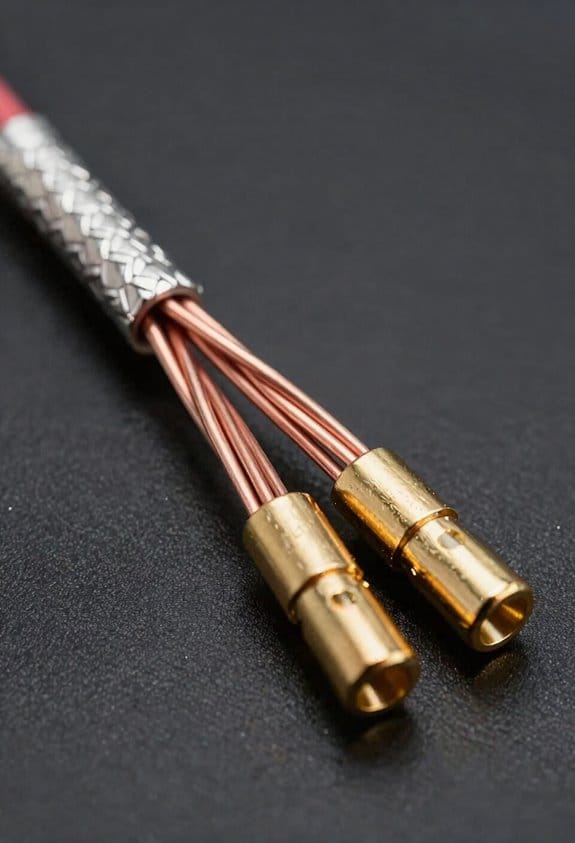
Insert, Fan Out, and Tighten Heavy‑Gauge Wire in Banana Plugs

Ever tried to get a clean sound out of a speaker and ended up with a hiss that won’t quit? The trick is in the way you seat the wire inside the banana plug. First, strip the end of your 12‑AWG cable and fan the strands out so each one touches the plug’s interior. A well‑spread bundle cuts resistance and stops any single strand from hogging the load, which means less heat and a clearer signal.
Next, fold the wire back a bit so it sticks out about 3‑5 mm from the plug. Then tighten the set screw just a half turn past the snug spot—think of it as a firm handshake that holds the strands without crushing them. You’ll feel the difference as soon as the speaker powers up.
I make sure each strand sits flush against the copper collar before giving the screw a solid quarter‑turn. That locks the wire in place and stops micro‑movement that can cause static. If you want extra protection, slide a crimp sleeve over the joint before tightening, then finish with a heat‑shrink tube to seal out moisture and keep things tidy. This simple step adds durability, prevents fraying, and keeps the connection solid under vibration, so your system stays loud and clear for years.
Worth knowing:
- Use a small screwdriver that fits the set screw snugly; a loose fit can strip the head.
- After tightening, give the plug a gentle tug to confirm the wire won’t slip out.
Try this:
– Cut a tiny notch in the copper collar with a needle file; it helps the strands stay in place when you tighten the screw.
You’ll notice a cleaner sound almost immediately. Ready to give your speakers the upgrade they deserve?
Connect Heavy‑Gauge Banana Plugs to Binding Posts and Test Audio

Ever tried to get that clean, distortion‑free sound from your amp, only to end up with a buzz or weak output? The trick is in how you seat those heavy‑gauge banana plugs into the binding posts.
First, push the red plug into the red post and the black plug into the black post. Make sure each plug clicks into the 0.5‑inch‑diameter hole, then tighten the set screw just enough so it holds firm without stripping the copper. After you power the amp, grab a multimeter and check for a steady 8 Ω impedance on both channels. That quick test tells you the impedance matches and the amp isn’t losing power.
If a hum shows up, don’t panic. Here’s a short ground‑loop routine: verify all chassis grounds, connect everything to a single‑point ground, and if the buzz persists, slip a 0.5 µF capacitor in series with the signal line. You’ll usually hear the hum disappear right away.
Worth knowing: a solid connection also protects your amp from overload. The heavy‑gauge wires handle the current without heating up, and the tight set screw keeps the copper from vibrating loose over time.
Frankly, once the plugs are snug and the impedance checks out, you’ll get crisp audio with no buzz. Your system will feel rock‑solid, and you can crank the volume without worrying about distortion.
Give it a try and let me know how it sounds. Ready to hear your music the way it was meant to be heard?
Fix Common Problems When Heavy‑Gauge Banana Plugs Won’t Hold
Got a heavy‑gauge banana plug that just won’t stay put? You’re not alone—those bulky plugs can be stubborn, especially when the fit isn’t right. A 4 mm‑diameter plug should sit snugly in a 0.5‑inch (12.7 mm) binding post. If you feel any wobble, the collar is probably too loose, so the set screw can’t compress the copper strands enough for a solid link. That wobble often shows up as intermittent sound or a buzzing hum.
Frankly, the first thing to check is the fit. Make sure the plug’s collar matches the post’s size; a mismatch means the set screw won’t bite into the copper properly. If the plug still wiggles, try this: tighten the set screw to at least 0.5 Nm and double‑check that the wire is fully seated. A half‑inserted strand can let the screw spin without gripping, leading to a loose, noisy connection.
Worth knowing: crimp sleeves are a game‑changer for thick copper. They squeeze the strands uniformly, giving the plug a firm grip that stops it from slipping when you tighten the set screw. An adhesive backing on the collar can also help— it bonds the metal to the post, cutting down vibration and keeping the connection steady even after you move the speaker.
If you’ve already added a crimp sleeve and the plug still wobbles, look at the set screw itself. Make sure it’s not stripped and that you’re using the right size screwdriver. A stripped screw won’t apply enough pressure, and the copper strands will keep shifting.
Here’s the trick: after tightening, give the plug a gentle tug. If it moves, you probably need a tighter set screw or a better‑fitting collar. And remember, a little extra torque can make a big difference—just don’t over‑tighten, or you’ll damage the post.
Finally, check for any debris or oxidation on the post. A clean surface lets the plug sit tighter and reduces the chance of a buzzing hum. A quick wipe with a dry cloth can do wonders.
Give these steps a try and see if the connection stays solid. Got any other tricks that work for you?
Frequently Asked Questions
How to Prevent Corrosion on Banana Plug Contacts Over Time?
I protect banana plug contacts by applying a thin protective coating, like silicone or lacquer, and store them in a dry, low‑humidity environment; this prevents oxidation and keeps the connections reliable over time.
Can I Use Banana Plugs on Speaker Wire With a Different Gauge on Each Side?
I’ll tell you yes—you can use banana plugs on speaker wire with different diameters, but you’ll need an adapter use to make sure a snug fit and reliable connection.
What Is the Best Method to Label Wires After Installing Banana Plugs?
I recommend using color‑coded tags and heat‑shrink labels: slide a colored tag onto each wire, then apply a heat‑shrink label with the speaker name, sealing it with a heat gun for durability.
Do I Need to Apply Dielectric Grease to the Plug’s Screw Mechanism?
I’d say a dab of dielectric grease works like a silent peacekeeper, applying lubricant to the screw mechanism to prevent oxidation and keep the connection humming smoothly for years.
How Often Should I Re‑Tighten Banana Plug Set Screws for Optimal Performance?
I recommend tightening the set screws during annual checks and doing a seasonal tightening each spring and fall; that way the connection stays solid and you avoid intermittent sound loss.