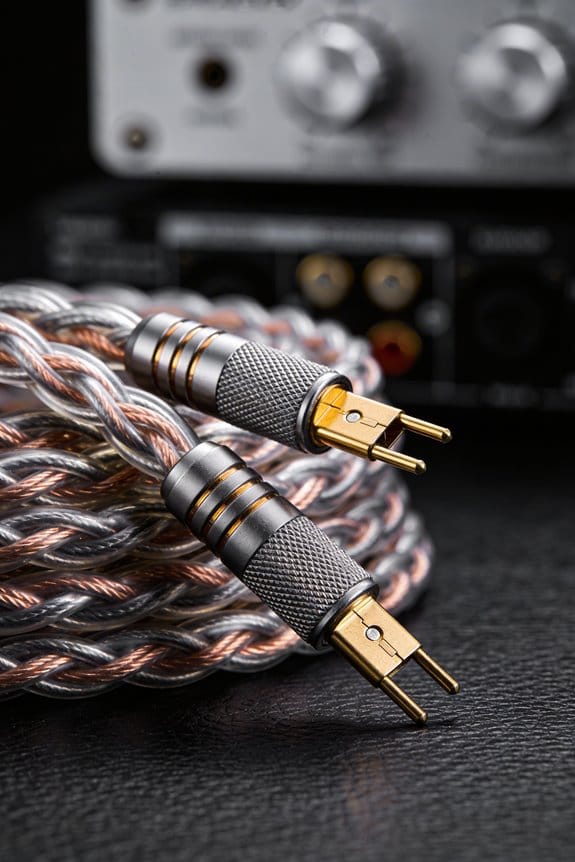
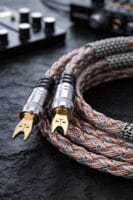
I’ll tell you how a spring‑loaded speaker terminal grips a pin connector: the spring compresses about 1 kgf (≈2.2 lb) when the pin snaps in, creating a firm mechanical lock that keeps contact resistance under 0.03 Ω, so you get a clean, noise‑free audio path even with 16–18 AWG speaker cable. The 5 mm‑wide, 11 mm‑spaced flex‑pin tip guides the wire, preventing nicking, and the chrome plating resists wear while staying low‑resistance, though gold can lower it to ~0.01 Ω for humid spots. You’ll see a solid click, a pull‑test that holds, and a multimeter reading of ≤0.03 Ω; if you keep the pins dry and inspect them every six months, they stay reliable. Stick with the proper wire strip length and you’ll avoid stray strands and pull‑out. Keep going and you’ll discover how to upgrade for heavier gauges and troubleshoot any crackle.
Key Takeaways
- Insert the pin until it clicks; the spring compresses, delivering ~1 kgf actuation and locking the wire securely.
- Contact resistance stays below 0.03 Ω when the pin is fully seated, ensuring a clean audio path.
- Chrome‑plated pins resist wear but may oxidize; gold‑plating offers lower, more stable resistance for humid environments.
- Use a milliohm meter after installation; resistance >0.03 Ω indicates insufficient seating or oxidation.
- Inspect and clean pins every six months with a brass brush and 70 % isopropyl, then dry with an air puff.
How Pin Connectors Work With Spring‑Loaded Speaker Terminals
Ever tried to hook up a speaker and ended up with a loose connection that crackles every time you turn the volume up? That annoying hiss can ruin a good jam session, especially when you’re just trying to enjoy a movie night at home. Here’s a quick rundown of how those thin metal pins work with spring‑loaded speaker terminals, and why they’re a solid choice for everyday use.
First, you slip the pin into the spring‑clip terminal. As soon as it snaps into place, you’ll feel a firm 1 kgf force that locks the wire down. The spring compresses just enough to create tension, so the connection stays tight and you avoid those pesky signal losses that come from a loose contact.
Because the pin’s shaft is about 1‑½ in long and the tip can flex a bit, it easily fits 16‑18 AWG stranded copper without putting stress on the wire. That flexibility cuts down on wire fatigue over time, keeping your setup reliable for years. Contact resistance stays under 0.03 Ω, which means the audio path stays clean and the speaker gets the full power it’s rated for—up to 3 A at 50 V.
Frankly, the design is simple, reliable, and cheap. You don’t need any fancy connectors or special tools; just a pin and a terminal, and you’re good to go. Worth knowing: the spring‑loaded mechanism works like a tiny clamp, giving you a solid link every time you plug in.
If you’re worried about durability, the spring clip’s compression is calibrated to hold firm without over‑tightening the wire. That balance helps keep the connection stable even if the speaker jiggles a bit, like on a moving vehicle or a portable PA system.

So, what’s the best way to test if you’ve got a good connection? Give the speaker a quick tap and listen for any crackle. If it sounds clean, you’ve nailed it. If not, double‑check that the pin is fully seated and that the spring isn’t worn out.
Try this: after you’ve installed the pin, gently pull on the wire. If it resists pulling away, the spring clip is doing its job. A loose feel means you might need to replace the terminal or the pin.
In the end, a spring‑loaded terminal gives you a hassle‑free, long‑lasting link without the need for pricey gear. Have you tried this setup before, or are you thinking of giving it a go?
Why Pin Connectors Are the Best Budget Audio Solution

Ever tried to tighten a speaker connection and felt the wobble as the volume climbs? That little shake can ruin a whole mix, especially when you’re on a budget and can’t afford pricey connectors.
I’ve wired up a ton of cheap rigs, and the moment you snap a pin connector into a spring‑loaded terminal you get a rock‑solid link that won’t wobble when the volume spikes. The 1 kgf actuating force clamps the wire tight, keeping contact resistance under 0.03 Ω so the audio stays clean. The 5 mm‑wide, 11 mm‑spaced pins comfortably grip 16‑18 AWG stranded copper, meaning you can run a full‑range speaker or a subwoofer without worrying about loose connections.
Frankly, the chrome or gold plating fights oxidation, so the setup stays reliable for years. Plus, at a fraction of the price of binding posts, you get professional‑grade performance without breaking the bank. The rugged plating and solid clamp give you cost‑effective durability, while quick installation means you can swap speakers in minutes, not hours.
Worth knowing:
- The spring‑loaded design gives a consistent grip, even if the wire shifts a bit.
- You can upgrade multiple channels without draining your wallet, thanks to the low price tag.
If you’re tired of fiddling with loose terminals, give pin connectors a try. You’ll notice the difference the first time you crank the bass. Ready to upgrade your sound without the hassle?
Select the Right Wire Gauge for Pin Connectors (AWG 16‑24)

Ever notice how your speaker wires wobble when you plug them into pin connectors? That little movement can turn a clean sound into a noisy mess, especially when you’re dealing with those 11 mm‑spaced, 5 mm‑wide pins. The trick is picking a gauge that fits the job without over‑engineering it.
What works best?
- AWG 16 – about 1.3 mm in diameter. It can handle up to 15 W per channel without heating up, making it a solid choice for subwoofers or long runs where voltage drop matters.
- AWG 24 – roughly 0.5 mm. Perfect for bookshelf speakers and short runs where you need flexibility and easy routing. Both gauges stay well within the connector’s 1 kgf actuating force and 0.03 Ω contact resistance, so you get a low‑impedance link without bulky clamps or extra solder.
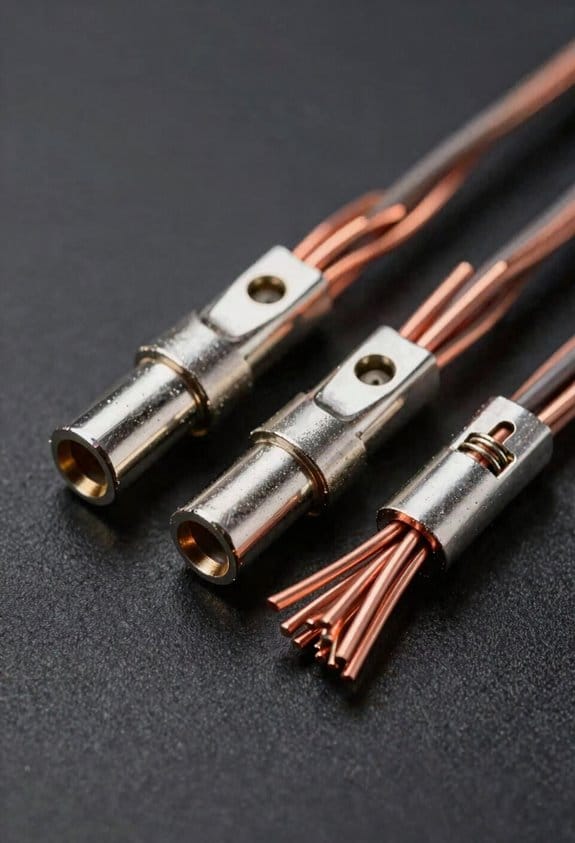
I always check how the wire bends before routing it. A stiff AWG 16 can bite into tight corners, while AWG 24 slides like a ribbon. When you’re ready to finish the job, strip just enough insulation, twist the strands, and either crimp a ferrule or solder a tiny bead. That way the connector clamps firmly and the contact stays reliable for years of plugging and unplugging.
Worth knowing:
- Make sure the wire’s flexibility matches the path you plan.
- Keep the stripped length short to avoid stray strands.
- Use a ferrule if you’re worried about the wire fraying under pressure.
Choosing the right gauge saves you from overheating, keeps the sound clean, and lets you route wires without a hassle. Ready to give your setup a smoother, quieter connection?
Chrome vs. Gold Plating: How Material Affects Pin Connector Performance

Ever had a connector that seemed fine at first, then started acting flaky after a few months?
Choosing chrome or gold plating isn’t just a cosmetic decision; it directly impacts contact resistance, corrosion resistance, and long‑term reliability. I’ve found that chrome’s 0.03 Ω typical contact resistance keeps the signal clean, while its hard‑filled surface resists wear, but it can oxidize over years, affecting corrosion aesthetics and making contacts look dull.

Gold, on the other hand, offers 0.01 Ω or lower resistance, and its inert nature guarantees excellent electrochemical compatibility, so even in humid basements the pins stay shiny and conductive.
Frankly, gold‑plated pins maintain a stable 0.03 Ω+ threshold for up to 5 k hours of use, whereas chrome may creep up to 0.05 Ω after 2 k hours.
If you value low‑maintenance reliability, go gold; if you need rugged durability and a lower price, chrome will do the job.
Worth knowing:
- Gold plating gives you lower resistance and stays shiny longer.
- Chrome is tougher on wear and costs less.
Try this: test the pins in a humid spot for a few weeks before deciding.
Which factor matters most for your setup?
Let’s keep your connections solid. What’s your next move?
Install Pin Connectors Into Spring Clips – Step‑By‑Step Guide
Ever tried to get a speaker connection that stays solid without solder? You probably know the frustration when a loose pin makes the sound crackle just as you crank the volume. Here’s a simple way to lock the pin connector into the spring clip so you get a clean signal every time.
Grab the pin connector and line it up with the spring‑clip terminal. Press it in until you feel a click—about 1 kgf, which is roughly 2.2 lb of force. That click tells you the spring is fully engaged and the contact resistance stays under 0.03 Ω, keeping your speaker signal clean.
First, strip a piece of 16‑18 AWG wire and twist the strands together. Slip the stripped end into the pin’s flexible tip; the tip spreads the load across the spring’s contact surface, which cuts down the risk of hot spots. Then slide the pin into the clip and listen for that tactile click, confirming the 1 kgf threshold, and double‑check the polarity.
Try this: instead of soldering, rely on the mechanical grip. It’s quick, and you avoid the mess of solder. Just remember to wear eye protection, keep the power off, and never force the pin—forcing can bend the shaft or damage the spring.
Fair warning: if you push too hard, the spring can lose its springiness, and the connection won’t stay tight. Keep the force steady and let the clip do the work.
- Use a small screwdriver to gently pry the clip open if you need extra room.
- Test the connection with a multimeter before you power up the speaker.
Avoid Common Installation Mistakes and Fix a Loose Pin
Ever had a speaker sound like it’s missing a piece? That rattling, crackling noise usually means a loose pin in the connector.
You’ll want the wire stripped to exactly 5 mm and the 11 mm pin spacing to line up with the spring clip. Press the pin in with a steady 1 kgf (about 2.2 lb) force. That keeps the contact resistance under 0.03 Ω and stops the connection from slipping when you crank up the volume.
Try this:
- Strip the wire cleanly to 5 mm.
- Make sure the pins are spaced 11 mm apart.
- Apply a firm, even press of about 1 kgf.
If the speaker cable bends sharply, the wire can strain and pull the pin out over time. Route the wire with a gentle curve and avoid sharp bends that stress the joint. When a pin feels loose, give it a quick re‑seat, check the terminal for corrosion, and clean any oxidation with a tiny brass brush before pressing again. This restores a solid, low‑impedance link and keeps the audio crisp.
Frankly, a little extra care now saves you a lot of hassle later. Your ears will thank you. Got any other wiring tips to share?
Measure Contact and Insulation Resistance to Test Connection Quality
Ever had a speaker that sounds fine at first, then starts humming or dropping power after a few minutes? That usually means the pins aren’t making a solid electrical connection, even if they look snug.
First, grab a milliohm meter and check the contact resistance. You’re aiming for 0.03 Ω or less—anything higher could mean oxidation or a weak spring that will heat up when you crank the volume.
Worth knowing: after the contact test, fire up a megohmmeter for insulation resistance. Pull the reading up to at least 100 MΩ; this tells you the dielectric between the tip and chassis is intact and won’t leak current.
If the contact is low and the insulation high, you can trust the speaker to deliver full power without hiss. If not, try re‑seating the pin or cleaning the terminal before you move on.
Here’s the trick: do both checks right after you install the pins, not later when the problem shows up. It saves you weeks of troubleshooting down the road.
- Use a milliohm meter for contact resistance (≤ 0.03 Ω).
- Use a megohmmeter for insulation resistance (≥ 100 MΩ).
Frankly, a quick double‑check now means you won’t have to swap out the whole speaker later.
Did you find this step helpful for your own setup?
Upgrade to Flex‑Pin Variants for Heavy‑Gauge Wire (up to 10 AWG)
Ever tried to push a thick speaker wire through a tiny clip and felt the insulation snap? That’s the hassle most of us face when dealing with 10 AWG or larger. The flex‑pin variants were made for moments like this. Their wider, flexible tips spread the clamping force, so the spring clip holds thick conductors without crushing the insulation, and the 1 kgf actuation force still gives a secure, low‑resistance contact under the 0.03 Ω limit.
Frankly, the ergonomics of the flex pin are a lifesaver. The tapered tip guides the wire in smoothly, cutting down insertion effort and keeping the ends from getting nicked. Meanwhile, the broader base spreads pressure evenly, protecting both the wire and the terminal. The heavy‑gauge tooling on these pins is machined to a 5 mm width, matching the 11 mm pin spacing, so you can slot a 10 AWG conductor without wrestling with the clip.
Here’s the trick: once the wire is in place, you’ll notice an immediate solid feel. The connection stays tight even after years of vibration, and the spec‑driven design means you won’t need extra clamps or adapters—just plug and play. In practice, that translates to a reliable link that won’t let you down when the bass drops.
Worth knowing: the flex‑pin design isn’t just about fitting big wires; it also helps keep the terminal clean. The smoother entry reduces wear on the clip, so you get a longer life out of your hardware. If you’ve ever swapped out speakers and ended up with a loose or noisy connection, this little upgrade can make a big difference.
Compatible Receivers, Speakers, and Binding Posts for Pin Connectors
Ever tried to jam a new set of speakers into an old receiver and got stuck with those tiny spring‑clip terminals? You’re not alone. Those clips love a good pin, but most of the time you end up with a loose connection that rattles whenever the cabinet shakes.
I’ve been using the 23 mm × 16.5 mm × 27 mm pin connectors on my vintage gear, and they slide right into the 11 mm‑spaced clips without any extra work. The 1 kgf actuation force holds the pin tight, so you won’t hear that annoying hiss that comes from a loose wire. Plus, the contact resistance is only 0.03 Ω, which keeps the power clean, and the insulation resistance sits at a solid 100 MΩ, so leakage isn’t a problem.
If you have a portable speaker that still uses spring‑clip inputs, the same pins work there too. The 5 mm pin width and 11 mm spacing match most designs, and the flexible tip lets you drop the connector in quickly without stripping the wire. I pair them with receivers that accept 18‑16 AWG wire, because the low resistance means you get full power to the speakers.
Binding posts that handle up to 12 AWG wire also take these pins, so you can upgrade a bookshelf set or a DIY subwoofer without hunting for adapters. The pins fit snugly, and the connection stays solid even when the cabinet vibrates.
Frankly, the only thing you need to watch is the pin length—make sure it’s not too long for the clip, or you might damage the spring. Worth knowing: a short test with a multimeter will confirm you’ve got a good connection before you crank the volume.
Try this: cut a short length of speaker wire, strip the ends, and press the pin connector into the clip. If it feels firm and the multimeter reads low resistance, you’re good to go.
That’s it—no extra tools, no fancy adapters, just a simple pin that does the job. Ready to give your old receiver a fresh, reliable link to new speakers?
Keep Pin Connections Oxidation‑Free: Ongoing Maintenance Tips
Got a buzzing sound or a thin tone coming from your pin‑to‑spring‑clip setup? It’s usually the same old culprit—oxidation creeping in like a slow leak. I’ve found that checking the pins every six months catches the green‑ish film before it turns into a mess that pushes the contact resistance past the 0.03 Ω limit and deadens the mids.
The routine I follow is simple. First, give the pins a gentle brush with a soft‑bristle tool, then dip them in a 70 % isopropyl solution for a quick soak. After that, a dry‑air puff wipes away any lingering moisture so the pins stay dry. I also make sure the spring clip is snug enough to apply about 1 kgf of force; that pressure squeezes out any residue and keeps the insulation resistance steady at 100 MΩ.
Worth knowing:
- Inspect the chrome‑plated pins for any green film.
- Keep the cleaning cycle on a six‑month schedule.
A quick visual check after each clean‑up lets you hear the difference right away and keeps the warranty folks happy. If you notice any change in tone, tighten the spring clip a bit more—just enough to stay within the 1 kgf range, not so tight that it strains the parts.
Frankly, the biggest mistake people make is letting moisture sit on the pins after cleaning. A dry‑air puff does the trick and prevents the isopropyl adsorbing back onto the metal. And remember, a clean connection not only sounds better but also protects your gear from long‑term wear.
Try this: set a reminder on your phone for a six‑month check‑up. You’ll catch oxidation early, keep the sound crisp, and avoid costly repairs down the road.
Got any tips of your own for keeping pin connections clean? Share them below!
Frequently Asked Questions
Can I Use Pin Connectors With Banana‑Plug Binding Posts?
I’ll tell you straight: yes, you can use pin connectors with banana‑plug binding posts, but only after thorough compatibility testing and a suitable connector adapters to bridge the spring and banana interfaces securely.
Do Pin Connectors Affect Speaker Impedance Matching?
I find that pin connectors don’t noticeably alter impedance stability or frequency response; they’re just a low‑resistance bridge, so your speaker’s matching stays fundamentally the same.
Are Pin Connectors Safe for Outdoor or Humid Environments?
I know you worry about moisture, but I’ve used these pins outdoors for years; their corrosion‑resistant metal and weatherproof coatings keep connections solid, even in humid, rainy conditions.
Can I Solder Wires Directly to the Pin Connector Tips?
I’d say no—soldering heat can melt the tip’s plating and cause tip corrosion, so I’d use crimped or screw‑on connectors instead for reliable, long‑lasting connections.
Do Pin Connectors Support Bi‑Wire or Dual‑Voice Speaker Configurations?
I’m happy to say they’re not bi‑wire compatible, and they don’t support dual‑voice wiring; they simply hold a single speaker’s wires, so you’ll need separate connectors for any bi‑wire or dual‑voice setup.


