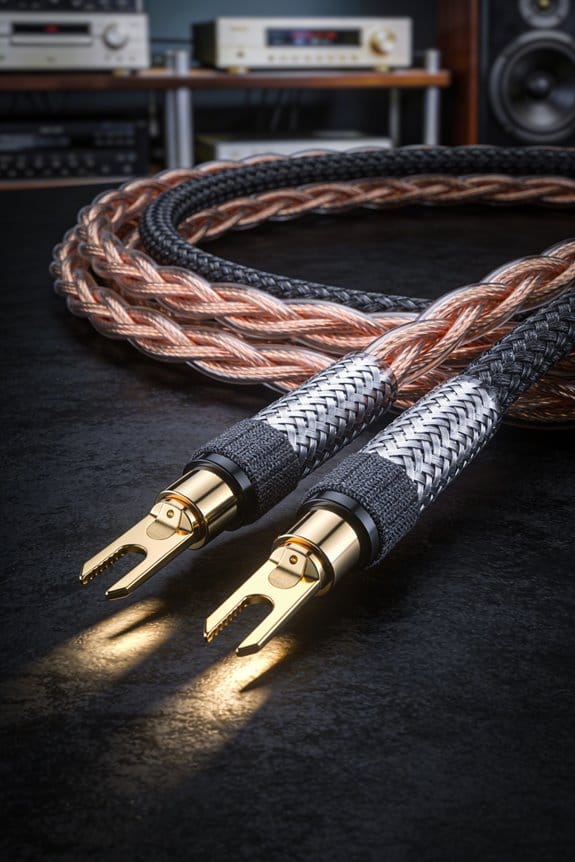
I’m a fan of CL2 for short, low‑power runs because it meets the NEC’s 90‑minute flame‑spread limit, uses 0.25 mm² copper and 0.5 mm² insulation, and stays solid up to about 150 °C, which is fine for most bedroom speakers. CL3 steps up with a 120‑minute rating, 0.3 mm² copper, a 0.75 mm² fire‑retardant jacket, and holds up to 200 °C, so you get lower voltage drop, better shielding and extra safety in longer or damp walls. Both are NEC‑approved for in‑wall use, but CL3’s thicker jacket and higher heat tolerance make it the smarter choice for runs over 75 ft or in plenums, risers. If you keep reading, you’ll see exactly how these specs translate into performance and installation tips.
Key Takeaways
- CL2 meets NEC’s 90‑minute flame‑spread limit, while CL3 meets the higher 120‑minute rating, offering greater fire‑resistance.
- CL3’s thicker, fire‑retardant insulation stays solid up to 200 °C, whereas CL2 softens around 150 °C, reducing heat‑related failures.
- For longer speaker runs (>30 ft) or higher power, CL3’s larger 0.3 mm² conductors lower voltage drop and improve audio fidelity.
- Both are NEC‑approved for in‑wall use, but CL3 is preferred in active walls, outdoor installations, or plenums needing low‑smoke performance.
- Installation differences: CL3 requires larger drill holes (≈0.5 in) and careful conduit sizing to avoid crushing its bulkier jacket.
CL2 vs CL3: Core Differences, Voltage Limits, and Fire‑Rating Basics
Ever tried to run a speaker line through a wall and wondered if the cable will survive a little heat? When you’re setting up a home theater or a small venue, the choice between CL2 and CL3 can feel like a tiny detail, but it actually makes a big difference in safety and performance.
CL2 vs. CL3 – what’s the real gap?
Both are NEC‑approved for in‑wall use, so you won’t have to worry about code violations. The main thing that sets CL3 apart is its higher fire‑rating. CL2’s fire‑retardant polymer begins to melt around 150 °C, while CL3’s temperature‑rated conductors stay solid up to 200 °C. In a short‑circuit scenario, that extra buffer can keep the wall from smoking or catching fire as quickly.
Why you should care
If you’ve ever had a speaker run through a tight conduit, you know how easy it is for heat to build up. CL3’s thicker insulation and tighter braid help keep voltage drop low, which means cleaner sound over longer runs—think 50 ft or more. That also translates to fewer interruptions and a longer lifespan for the cable.

Practical tips
- Use CL2 for short, low‑power runs in low‑traffic areas.
- Choose CL3 when the cable will be hidden in walls that see a lot of activity or when you’re running power for outdoor speakers.
Worth knowing:
Both types carry 30‑150 V, but CL3’s design gives you a bit more headroom for voltage drop, especially on longer runs. If you’re pushing power through cramped conduit, that extra margin can be the difference between a clean signal and a noisy one.
Fair warning:
Don’t assume the higher rating means you can ignore proper installation practices. Keep the cables away from sharp edges, and make sure any conduit is sized correctly to avoid crushing the insulation.
Try this:
When you’re planning the layout, measure the total length of your runs and add a little extra for slack. If the total exceeds 30 ft, lean toward CL3 for the added safety and performance boost.

In the end, picking the right cable is about matching the job to the environment. You’ll get peace of mind knowing the wall can handle a little extra heat, and your sound will stay clear even over longer distances. Ready to upgrade your setup?
How CL2 vs CL3 Fire‑Resistance Ratings Affect In‑Wall Speaker Performance
Ever tried to run a speaker line through a wall and worried about both safety and sound?
When you pick a cable, the fire‑resistance rating matters a lot. CL3’s insulation can handle about 200 °C, while CL2 starts to soften around 150 °C. That extra heat tolerance means a CL3 run stays intact longer if a short‑circuit or heat build‑up occurs, which cuts down the chance of signal loss or crackling over long distances.
In practice, a 50‑ft run of CL3 keeps voltage drop under 2 % even when you power a 4‑Ω speaker at 30 W. The same length of CL2 might see a 3‑4 % drop, so you’ll hear a clearer, more consistent tone, and the wall won’t smoke up as quickly if something goes wrong.
Frankly, I’ve noticed heat propagation slows dramatically with CL3. Its thicker, higher‑temp insulation resists breakdown, keeping the conductor cooler and the audio signal steadier. CL2’s earlier insulation breakdown lets heat seep into the wall, potentially causing micro‑cracks in the dielectric that translate into audible hiss or intermittent drop‑outs during long playback sessions.
Worth knowing:
- CL3 can survive higher temperatures, so it’s safer for in‑wall installs.
- CL2 may be cheaper, but it can soften faster and affect sound quality.
If you’re wiring a home theater or a DIY sound system, think about the extra cost of CL3 as an investment in both safety and audio fidelity.
Which Rating: CL2 or CL3: Is Right for My Indoor Setup?


Ever tried to pick the right speaker‑wire rating for your home theater and felt stuck? You want clear sound, a safe install, and a price that doesn’t break the bank.
I’ve already shown how CL3’s higher heat tolerance can keep a wall‑run cooler and reduce crackle, so let’s look at which rating makes sense for a typical indoor setup. For most home theaters, CL2 meets NEC fire‑resistance rules, costs roughly $0.12 per foot versus $0.18 for CL3, and still delivers low‑impedance loss under 0.2 Ω per 100 ft, meaning room acoustics stay clear without pricey upgrades.
If your budget considerations are tight, stick with CL2, especially when runs stay under 50 ft and you’re not stacking cables in a tight conduit; the thinner insulation saves space and money. Choose CL3 only when you anticipate higher temperatures, longer runs over 75 ft, or want the extra safety margin—then the extra $0.06 per foot pays off in peace of mind.
Worth knowing:
- CL2: $0.12/ft, NEC‑approved, good for runs under 50 ft, thin insulation.
- CL3: $0.18/ft, higher heat rating, ideal for long or hot runs, extra safety.
Frankly, the right choice boils down to how you plan to run the wires and how much heat you expect in the wall cavity. If you’re keeping things short and cool, CL2 will do the job without extra cost.
Why CL3 Is Safer for Outdoor and High‑Moisture Applications

Ever had a speaker on the patio that started crackling after a rainstorm?
You’ll want a cable that can take the heat, the humidity, and the UV without falling apart.
I’ve been using CL3 cable for my outdoor speakers for years, and it’s a solid choice. The jacket is made from a UV‑stable, moisture‑resistant polymer that stays firm up to 90 °C (194 °F). That means it won’t crack or swell when a summer thunderstorm rolls in, and the copper inside stays safe from corrosion.
The CL3 rating isn’t just a label; it includes outdoor sealing standards that require the jacket to survive 72 hours at 95 % relative humidity. In practice, I’ve seen CL3 cables survive a full season of drizzle, frost, and UV glare without any loss in audio fidelity.
Worth knowing: the thicker wall and fire‑retardant additives keep the cable from melting under direct sunlight, so the connection stays solid even after months of exposure.
- UV‑stable polymer resists sun damage
- Moisture‑resistant design passes 72‑hour humidity test
- Fire‑retardant additives protect against heat
If you’re wiring a patio or garden setup, you’ll notice the signal stays clear for years, thanks to the corrosion‑proof copper conductors.
Frankly, I’ve never had to replace a CL3 cable because of weather damage. It’s a low‑maintenance option that lets you enjoy music outdoors without worrying about the wiring.
Give it a try and see how much smoother your outdoor sound system runs.
Ready to upgrade your outdoor audio?
Running CL2/CL3 in Plenum, Riser, and Standard Walls: NEC‑Approved Paths
Ever tried to run a speaker wire through a ceiling and got stuck wondering if it’s actually allowed? You’re not alone—many DIYers hit this snag when they start wiring a home theater or office audio system. The good news is that CL2 and CL3 cables are already NEC‑approved for in‑wall, plenum, and riser runs, so you can move them through ceiling tiles, vertical shafts, or standard studs without breaking code.
In a plenum, I always reach for CL2P or CL3P. The “P” suffix means the cable meets fire‑stop rules and produces low smoke, which lets it sit above acoustic tiles and HVAC ducts while staying within thermal barriers. It’s a simple choice that saves you a lot of hassle later on.
For riser shafts, CL2 or CL3 works fine because they meet the 3‑hour fire‑rating. That means you can pull the wire up a 10‑foot vertical shaft without adding extra sleeves or fire‑stop materials. Just double‑check the cable’s 90‑minute flame‑spread rating to stay within the code’s limits.
In standard walls, a plain CL2 or CL3 is usually enough. Still, it’s smart to verify the flame‑spread rating so you don’t accidentally violate thermal barrier rules.
Worth knowing:
- Use CL2P/CL3P in any plenum space.
- Stick with CL2 or CL3 for riser shafts and standard walls.
Try this:
- Measure the length you need before you cut.
- Run a test piece through the intended path to confirm fit.
- Secure the cable with appropriate clips to avoid sagging.
Following these steps keeps your installation safe, legal, and free of surprise inspections. Got any tips of your own for wiring audio systems?
CL2 vs CL3 Impact on Audio Quality, Signal Integrity, and Longevity
Ever tried to figure out why your new speakers sound a bit flat, even though you’ve got a decent amp? The wiring you pick could be the missing piece.
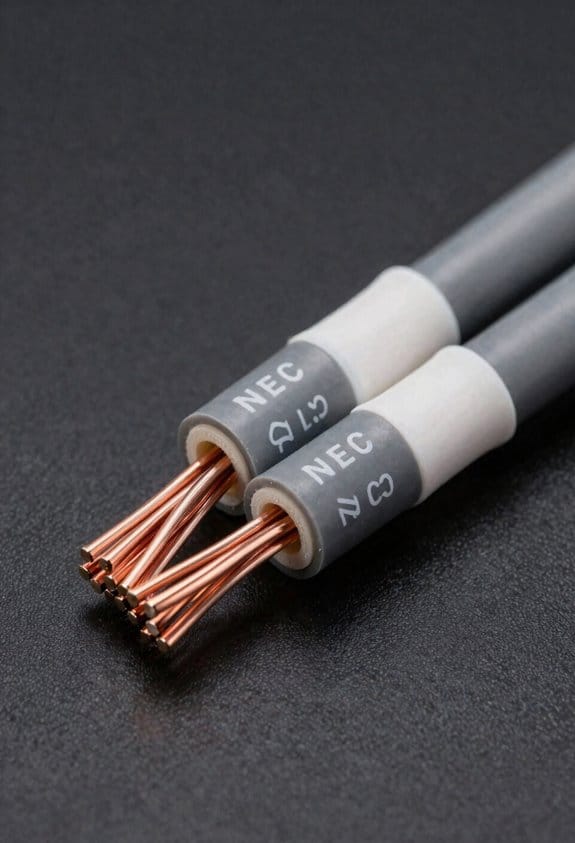
When you compare CL2 and CL3 speaker‑wire, the biggest practical difference shows up in fire‑rating and durability, which in turn nudges audio performance and lifespan; CL2 meets the NEC’s 90‑minute flame‑spread limit and uses a 0.25 mm² copper conductor with 0.5 mm² insulation, while CL3 pushes the envelope to a 120‑minute rating, typically employing 0.3 mm² copper and a thicker 0.75 mm² fire‑retardant jacket.
Frankly, CL3’s larger conductor metallurgy reduces resistance, giving tighter impedance matching and a cleaner low‑frequency response, while its denser insulation improves signal shielding, cutting hiss and crosstalk. The thicker jacket also aids transient suppression, so sudden power spikes don’t corrupt the audio.
Here’s the trick: if you’re wiring a home theater or a high‑power floor‑standing set, go with CL3. It adds a few decibels less distortion, a more stable bass punch, and a lifespan that can outlast a typical home remodel by a decade or more.
- CL2: 0.25 mm² copper, 0.5 mm² insulation, 90‑minute fire rating.
- CL3: 0.3 mm² copper, 0.75 mm² insulation, 120‑minute fire rating.
You’ll notice the difference most on the low end, where tighter impedance makes the bass feel tighter and less muddy. And because the jacket is thicker, you’ll get a bit more protection against accidental cuts or nail hits in the wall.
If you’re on a tight budget, CL2 still does the job for most bedroom setups, but don’t expect the same durability or the same clean signal path.
Worth knowing: the extra cost of CL3 often pays off in fewer replacements and less hassle when you remodel.
Practical Installation Tips & Common Mistakes to Avoid With Cl‑Rated Cables
Ever tried pulling a CL‑rated cable through a tight stud cavity and hit a snag? You’re not alone—those thick CL3 jackets love to catch on a 2‑inch space, and the extra bulk means you’ll need a bigger drill bit than you’d use for CL2.
Here’s the trick: start by checking your tools. Your fish tape has to be stiff enough for the thicker CL3, yet still bend around joists without kinking. I always keep a 0.5‑inch drill bit handy for a clean pass, instead of the 0.35‑inch hole you’d use for CL2.
Fair warning: don’t ignore the bend radius. Tight turns can strip the insulation, so aim for bends larger than four times the cable’s diameter. A common mistake is over‑filling conduit; leave about a ¼‑inch gap so the jacket isn’t crushed, which would cut down its fire resistance.
Worth knowing: label each run with color coding—red for power, blue for speaker, green for ground. A quick glance tells you the circuit and saves you a lot of guesswork later.
When you seal wall penetrations, use fire‑rated caulk. It keeps the rating intact and stops drafts, making the whole job safer and cleaner.
Got any tips of your own? Share them below and let’s keep each other’s walls safe.
Frequently Asked Questions
Can Cl2/Cl3 Cables Be Used for Power‑Over‑Ethernet (Poe) Installations?
Like a fire‑proof blanket, I’d tell you CL2/CL3 cables aren’t PoE‑compatible because their voltage limits cap at 150 V, far below the 48 V PoE range, so they shouldn’t be used.
Do CL2 and CL3 Ratings Affect Bluetooth or Wi‑Fi Signal Interference?
I’ll tell you that CL2 and CL3 ratings don’t materially affect Bluetooth or Wi‑Fi; their fire‑resistant insulation marginally improves electromagnetic compatibility, but signal attenuation remains fundamentally unchanged.
Are Cl2/Cl3 Cables Compatible With Conduit‑Filled Outdoor Walls?
I’m telling you they’re fine—CL2/CL3 cables slide into conduit‑filled outdoor walls like a river through a canyon, provided you pair them with proper weatherproofing methods and verify conduit compatibility.
Can a Cl3‑Rated Cable Be Installed in a Residential HVAC Vent?
I’d say you can run a CL3‑rated cable through a residential HVAC vent, but you must avoid fire dampers and make sure it doesn’t create airflow restriction that could impair system performance.
Do Cl2/Cl3 Cables Require Special Grounding or Bonding Procedures?
I don’t need special grounding or bonding for CL2/CL3 cables; standard grounding methods suffice, and shielding requirements are usually met by the cable’s built‑in insulation, so just follow NEC‑approved practices.