I pull the baseboard just enough to leave a ½‑inch gap in the tack strip, notch the molding with a ¼‑inch groove so the cable slides under without bulging, then use a spring‑coiled fish tape with a built‑in hook to feed 12‑AWG speaker wire through a ¾‑inch pilot hole into the wall cavity, protecting the run with fire‑rated conduit and low‑profile PVC raceway or snap‑fit molding, securing everything with zip‑ties, labeling each end with heat‑shrink tags, and you’ll end up with a clean, durable install that looks seamless and performs flawlessly—keep reading for the next steps.
Key Takeaways
- Use a shallow notch or groove in the baseboard molding to create a hidden channel while keeping a ½‑inch clearance for the cable.
- Pull speaker wire with a spring‑coiled fish tape through a ¾‑inch pilot hole, moving gently to avoid kinks and insulation compression.
- Choose the proper AWG gauge (12 AWG for long runs, 16 AWG for short runs) and UV‑protected jacket if any exposure is possible.
- Secure the wire with low‑profile clips or a snap‑fit surface molding, spacing clips every 12 inches to prevent sagging and maintain a flat profile.
- Label each end with heat‑shrink tags, terminate with banana plugs or spade connectors, and test at full volume for hiss‑free performance.
Prep Baseboards and Tack Strips for Hidden Speaker Wiring
Got a mess of speaker wires and hate the thought of ripping up your walls? You can hide them without a big demolition job—just a few simple steps and a little patience.
First, pull the baseboards just enough to expose the tack strips. A half‑inch gap from the wall works best; it creates a natural channel for the cable to slide in smoothly and stay out of sight. I start by cutting a 2‑inch strip of carpet near the base, which lets me see the strips without damaging the floor. Then I notch the molding at each end, cutting a ¼‑inch groove so the wire can pass under the trim without bulging.
Worth knowing: the half‑inch clearance keeps the cable flat, the notch holds the molding tight, and the carpet removal gives you easy access for future upgrades. This prep gives you a concealed path, prevents snagging, and lets you keep the room’s look intact.
Frankly, it’s a small effort that pays off big time. You’ll end up with a clean look and no visible wires, and you won’t have to worry about tripping over cords later.
Ready to try it? Give it a go and see how quickly your room can look polished again.
Run Speaker Cable Through Wall Cavities With Fish Tape


Ever tried to run speaker wire through a wall and ended up with a mess of drywall patches? You’re not alone. The trick is using fish tape—a spring‑coiled strip that slides through tight spaces and grabs the wire with its built‑in hook.
First, find a low spot near the baseboard where you can slip the tape in. Drill a ¾‑inch pilot hole and feed the fish tape in, keeping the coil tight and the tip angled toward the stud cavity. When you hit insulation, move the tape gently so it glides through loose‑fill without compressing it—that helps keep the wall’s thermal performance intact.
Once the tape pops out at the outlet, hook the speaker wire onto it and pull steadily. You’ll see the cable run straight, without kinks, giving you a clean, hidden connection in minutes instead of hours.
Frankly, the whole process is easier than you think once you get the hang of the tape’s motion.
Here’s the trick: work slowly, keep the tape’s coil tight, and let the built‑in hook do the heavy lifting.
Tips for a smooth run
- Drill the pilot hole just big enough for the tape; a ¾‑inch size works well.
- If the tape gets stuck, back it out a little and try a different angle.
What to watch out for
- Avoid pulling too hard; you could snap the wire or damage the tape.
- Make sure the wire isn’t twisted as you pull—that prevents future noise issues.

Give it a try next time you need a hidden speaker line. You’ll be surprised how quickly the wall stays intact and the sound stays clean. Ready to ditch the drywall drama?
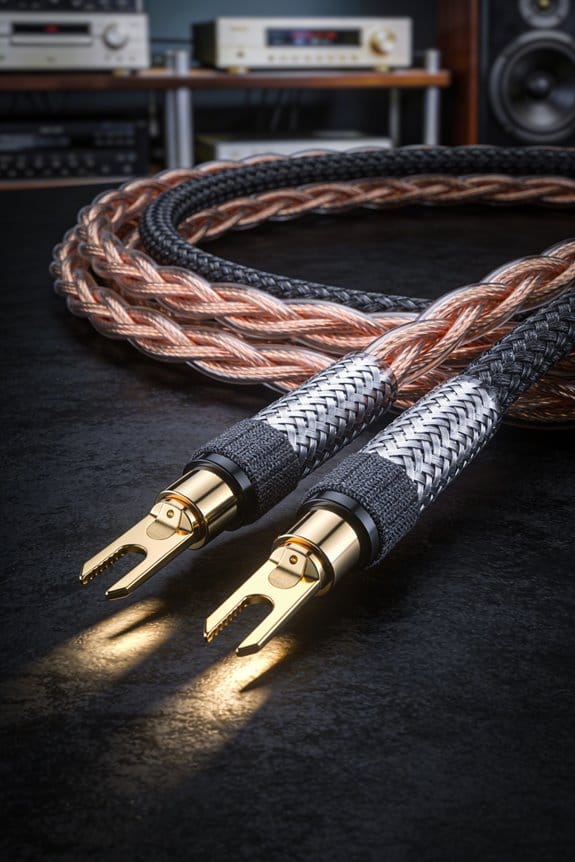
Select the Right Speaker Cable Gauge and Protect It

Ever tried to run speaker wire across a long hallway and ended up with a hissy‑fit at the far end? The trick is picking the right gauge, and it’s not just a numbers game. A 12‑gauge (AWG 12) cable will keep a 4‑Ω load strong up to about 100 ft, while a 16‑gauge (AWG 16) works fine for 30‑ft runs on 8‑Ω speakers. That means you won’t hear hiss or a drop in volume in the back of the room.
Frankly, checking impedance before you buy is a must. A mismatch can turn a clean signal into a muddy mess, especially if the amp and speaker ratings don’t line up. I always look at the specs first, then match the cable to the load. It’s a simple step that saves you a lot of headaches later.
Here’s the trick: protect your wire from the sun. If the cable will sit near windows or under skylights, choose one with UV protection. Sun‑induced brittleness can cause cracks, and cracked wires can short out or lose signal. A UV‑shielded jacket keeps the insulation flexible and strong for years.
Worth knowing: a thin, fire‑rated conduit adds an extra layer of safety without adding bulk. Wrap the wire in the conduit, and you’ll guard against accidental nicks, keep the cable from rubbing on sharp edges, and maintain flexibility for future moves. It’s a small step that makes a big difference in durability.
- Use a gauge that matches your run length and speaker impedance.
- Pick UV‑protected cable if it’ll be exposed to sunlight.
- Add a fire‑rated conduit for extra protection and flexibility.
Try this: after you’ve installed the cable, give each speaker a quick test at full volume. If everything sounds clean, you’ve got the right gauge and protection in place. If you hear any hiss or drop, double‑check the gauge and connections.
Install Raceways, Clips, or Built‑In Channels to Hide Speaker Wires

Ever notice how speaker wires end up dangling from the baseboard, making the room look messy? You can fix that with a simple raceway or clip system that hides the cables and keeps them safe.
When you snap a ½‑inch surface molding over the baseboard, the wire slides right inside. The snap‑fit means you won’t need extra screws, and the adhesive on the back sticks it firmly to painted walls. It’s a quick way to get a tidy look without drilling.
If space is tight, low‑profile clips work well. Space them about every 12 inches, and each clip’s spring‑loaded grip stops sagging. The built‑in channel keeps the wire flat, which helps cut down on acoustic interference.
For a cleaner, more permanent look, try this: cut a 2‑inch PVC raceway to length, then glue it with a silicone‑based adhesive. The raceway stays solid even when the floor expands, and it creates a straight line that blends with the wall.
- Choose a molding that matches your baseboard color for a seamless appearance.
- Use a silicone‑based adhesive for a strong hold on painted surfaces.
Fair warning: make sure the raceway is long enough to cover the entire run, or you’ll end up with gaps.
Label, Terminate, and Secure Connections for Long‑Term Reliability

Ever tried to untangle speaker wires after a remodel and ended up with a mess of colors and no clue which end goes where? It’s a hassle that can turn a simple setup into a full‑blown puzzle.
First, grab a heat‑shrink tag or a sturdy self‑adhesive label for each wire. Stick one at each end, print the room name, speaker number, and polarity—white stripe for positive, black for negative. A ¼‑inch‑wide label stays readable even after years of dust and cleaning, so you won’t mix things up later when the cables run through tight baseboard channels or wall cavities.
Next, terminate each conductor with a ¼‑inch banana plug or a solder‑capped spade connector. Twist‑lock the plug into a recessed terminal block. This gives a solid mechanical bond, cuts resistance, and makes future maintenance a breeze.
Worth knowing: secure each termination with a zip‑tie or clip, keeping the strain under 5 lb. That low‑tension setup stops the connectors from loosening, which helps preserve your warranty and avoids intermittent failures that could void a manufacturer’s guarantee.
If you’re worried about long‑term reliability, try this: run a quick visual check after installation. Make sure every label is still legible, every plug is snug, and no zip‑ties are too tight. A quick once‑over now saves hours of troubleshooting down the road.
Frankly, the extra few minutes you spend labeling and securing wires pay off big time when you later need to move a speaker or replace a component. You’ll thank yourself when the system stays quiet and consistent for years.
Frequently Asked Questions
Can I Use Carpet Adhesive to Secure Baseboard Channels?
Think of it like sealing a riverbank: carpet adhesive can hold baseboard channels, but check adhesive compatibility first and expect cleanup concerns later, especially if you need to remove or adjust the wiring.
What if My Walls Have Metal Studs Instead of Wood?
I’d still drill, but use a protective sleeve to avoid damaging the metal studs and prevent thermal bridging. The sleeve keeps the cable insulated, maintains structural integrity, and lets me route wires safely.
Do I Need a Fire‑Rated Conduit for Speaker Wires?
Like a hidden firewall, I’d say yes—most building codes require fire‑rated conduit for speaker wires running inside walls, especially near heat sources, to keep everything safe and compliant.
How Far Can I Run Speaker Cable Without Signal Loss?
I can run about 50‑75 feet of speaker cable before impedance and cable capacitance start hurting tone, but using low‑impedance, low‑capacitance wire lets me push it a bit farther.
Can I Install Baseboard Channels After the Carpet Is Replaced?
I’ll tell you it’s doable—like slipping a ribbon through a keyhole—if you plan aftercare considerations and trim compatibility, ensuring the new carpet doesn’t trap the channel and the baseboard aligns perfectly.