I start by drawing a simple floor‑plan, labeling zones like kitchen, living room, bedroom, and office, then I plot speaker spots about 3–5 ft from walls and at ear‑level (≈3 ft for sofas, ≈4 ft for stools) so the sound fills the space instead of hopping zones; I use CL2‑rated 14‑AWG copper for most runs, stepping up to 12‑AWG for anything over 50 ft to keep voltage drop under 2 % and preserve bass, and I pull the cable through 1‑inch PVC conduit under baseboards, sealing each wall plate with fire‑rated caulk and snap‑in connectors for future upgrades; I connect each speaker to the appropriate amp channel, check polarity, and set digital delay under 5 ms to align timing, which tightens imaging and eliminates echoy smearing; if you keep going you’ll see how to fine‑tune EQ, troubleshoot intermittent crackles, and know exactly when to call a pro.
Key Takeaways
- Use CL2‑rated, oxygen‑free copper cable (14‑AWG for runs ≤ 50 ft, 12‑AWG for longer) to meet fire codes and limit voltage drop.
- Run cables inside 1‑inch PVC conduit from the central rack to each wall cavity, stapling every 4 ft and sealing entry points with fire‑rated caulk.
- Route speaker wires under baseboards or through crawlspace pull‑strings, avoiding furniture and keeping runs under 50 ft per zone for optimal signal integrity.
- Install low‑profile wall plates with snap‑in connectors, leaving slack for splices and labeling polarity to prevent hum and phase issues.
- Test each speaker with a 1 kHz tone and a multimeter after installation; adjust delay and EQ as needed to ensure synchronized, balanced sound across zones.
Create a Floor‑Plan to Define Zones and Map Speaker Locations
Do you ever feel lost when trying to map out where your speakers should go? Sketching a floor‑plan is the easiest way to get a clear picture, so start by drawing a simple outline of each room. Label the zones—kitchen, living room, bedroom, home office—so you can instantly see where music, movies, or background sound will live. A clean zone map helps you decide how many speakers you need, which type (in‑wall, bookshelf, ceiling) fits best, and where the wiring will run without tripping over furniture.
Next, trace the room flow, noting where people walk, sit, and gather. A smooth flow cuts down on echo and boosts clarity. Plot speaker density, aiming for one speaker per 12‑sq‑ft of listening area in larger zones and one per 8‑sq‑ft in compact rooms. This balance keeps coverage solid without blowing your budget.
Mark ear‑level heights: about 3‑ft for sofas and 4‑ft for bar stools. Also note ceiling heights—8‑ft ceilings need wider dispersion. Finally, draw straight lines for wire routes, keeping them under doors and baseboards. This trick simplifies installation and avoids furniture obstacles.
- Frankly, the key is to keep the layout simple and practical.
- Worth knowing: always test the sound after you install each speaker to catch any dead spots early.
When you finish, you’ll have a floor‑plan that guides you from start to finish without any guesswork. Ready to give your space a sound upgrade?
Pick the Right Wire Type & Gauge per Zone
Ever tried to set up a home‑theater and got stuck choosing the right speaker wire? It’s easy to overthink it, but the right gauge and rating can keep your sound solid and your house safe.

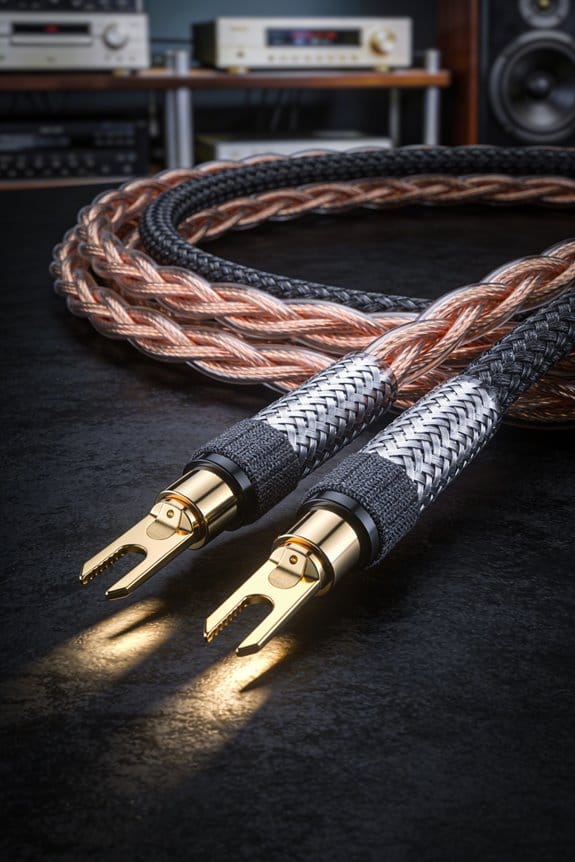
Pick CL2‑rated 14‑gauge for most living‑room spots
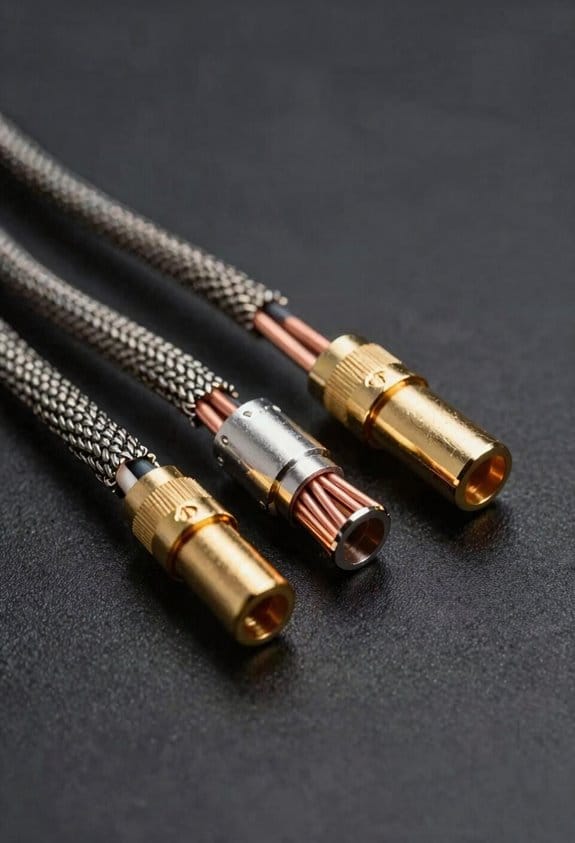
The fire‑safe rating means you’re meeting code, and 14‑AWG handles a typical 8‑Ω load without noticeable loss. That way your music stays punchy even when you crank the volume. I always go for oxygen‑free copper because its lower resistance helps the amp’s output match the speaker’s impedance, cutting out any dullness.
When the run gets longer, step up to 12‑gauge****
If you’re wiring a home office that’s a few feet away, the extra thickness keeps voltage drop under 2 %. It’s a simple way to keep the signal clean without adding extra gear. I also check capacitance with a multimeter; anything under 30 pF per foot shows a clean path.
Worth knowing:
- All my cables are UL compliant, so they pass fire codes and give me peace of mind.
- Running a quick multimeter test can spot bad connections before they become a problem.
Frankly, you don’t need a fancy setup—just the right gauge and a safe rating will do the trick. Try this: run a short test with your amp at full volume and listen for any loss of clarity; if it sounds solid, you’re good to go.
Got any other wiring questions? Let’s keep the conversation going.
Plan Efficient In‑Wall Speaker Wiring Routes & Concealment Strategies

Ever tried wiring your in‑wall speakers and ended up with a tangled mess that hurts sound quality? Here’s a simple way to keep your runs short, clean, and code‑safe.

I start by mapping the speaker runs from the amp to each wall cavity, making sure each zone stays under 50 ft. That keeps voltage drop below 2 % so the music stays clear even at high volume, and you won’t need a booster amp. Next, I trace the attic pathways and drop a fish tape down the joists. A pre‑drilled hole guides the wire straight to the bedroom wall, avoiding jagged bends that can cause interference.
When the house has a crawlspace, I swap the fish tape for a flexible pull‑string. It slides under the floor joists, keeping the run tight and safe from rodents. Inside the cavity I staple the cable every 4 ft, then seal the entry point with fire‑rated caulk. This meets code and gives a clean finish.
Worth knowing:
- Keep the cable length under 50 ft per zone.
- Use fire‑rated caulk at every entry point.
- Staple every 4 ft to hold the wire in place.
Frankly, this method saves time, cuts material waste, and leaves room for future upgrades. You’ll end up with a neat install that looks professional and performs great. Got a tricky spot in your house? Give this a try and see how easy it can be.
Install Conduits & Wall Plates for Future‑Proof In‑Wall Audio Wiring

Ever had to tear out drywall just to add a new speaker or subwoofer? It’s a pain, especially when you’re trying to keep the room looking clean and the wiring safe. The trick is to set up a conduit system that lets you swap gear without breaking the wall.
I’ll run a 1‑inch PVC conduit from the central rack to each wall cavity, then snap in a low‑profile wall plate with a 2‑inch opening for the speaker jack. The conduit shields the cable from drill‑bits, nails, and even rodents, while the plate lets you change speakers or add a sub without ripping up drywall again.
Frankly, I pick conduit size based on how many cables I need to pull. A 1‑inch pipe usually fits two 14‑gauge speaker runs plus a spare for future upgrades, so you won’t have to chase new holes later.
The wall plate’s snap‑in connectors lock the wires in place, stopping accidental pulls and keeping polarity consistent. That means a clean, reliable connection every time you plug in a new zone.
Try this: leave a few inches of slack inside the plate. It gives you room for a quick splice or a new subwoofer addition, turning a permanent install into a flexible, future‑proof system that adapts as your audio needs evolve.
Here’s the trick: use a low‑profile plate with a 2‑inch opening. It looks neat and gives you enough space for the jack and any future wiring tweaks.
- Run a 1‑inch PVC conduit from the rack to each wall cavity.
- Snap in a low‑profile wall plate with a 2‑inch opening for the speaker jack.
Connect Speakers to a Multi‑Channel Amplifier Rack

Ever tried to run a speaker line across a room and end up with thin, tinny sound? That’s usually the cable. Hook your speaker runs into the multi‑channel amp rack, and you’ll instantly see why a solid 14‑gauge, CL2‑rated cable matters—its thicker gauge reduces resistance, so even a 30‑foot run to the bedroom delivers crisp mids and punchy lows without volume loss, while the fire‑rated sheath keeps the walls code‑compliant.
I connect each speaker pair to the appropriate amp channel, checking polarity to avoid a ground loop that would hum, then I verify impedance matching; a 8‑ohm speaker on an 8‑ohm‑rated output gives a clean 1‑volt swing, while a 4‑ohm load on a 4‑ohm channel doubles power without distortion. I label every terminal, tighten the binding posts, and route the cables through the rack’s organized bus bars, which keep signal paths short, reduce crosstalk, and make future upgrades a breeze.
Worth knowing:
- Use 14‑gauge, CL2‑rated cable for runs longer than 20 feet.
- Match speaker impedance to the amp’s rating to avoid clipping.
- Keep polarity consistent to prevent hum.
Frankly, the biggest mistake people make is ignoring the cable’s fire rating. A CL2 sheath not only meets code, it also adds a layer of protection against accidental shorts, which can save you a lot of hassle later.
If you ever wonder why your bass feels weak, check the gauge first. A thinner wire will sap the low‑frequency energy, leaving you with a thin sound that’s hard to fix with EQ alone. By swapping to a thicker, fire‑rated cable, you’ll notice a fuller, richer tone right away.
Try this: run a short test with a single speaker and a fresh 14‑gauge line. Listen for any loss in volume or clarity, then compare it to your current setup. The difference will be clear, and you’ll know exactly what to replace.
Now that you’ve got the basics down, you can add more speakers or swap out amps without worrying about signal loss. Just keep the connections tight and the wiring tidy, and your system will stay reliable for years.
Got any other wiring tips you swear by? Share them in the comments!
Check Sync and Fine‑Tune Speaker Placement for Great Sound
Ever notice how your music seems to jump from one room to another instead of filling the whole house? That’s usually a sync or placement issue, and fixing it is easier than you think.
First, fire up a 1 kHz test tone on every zone and glance at the delay meter on your amp. If a room lags more than 5 ms, tweak the digital delay until the speakers line up in phase. This cuts out that echo‑y smearing and gets the sound tight.
Next, walk around and hunt for “sweet spots” about 3‑5 feet from the walls. Nudge each speaker a couple of inches up or down—small height changes can sharpen imaging and tame boomy bass.
Worth knowing: run a room‑tuning sweep with a mic and software, then set the EQ to -2 dB at 250 Hz for carpeted living rooms and +1 dB at 4 kHz for kitchens with hard surfaces.
- Play the test tone, check the delay meter, and adjust digital delay if needed.
- Walk the room, find sweet spots, and move speakers a few inches for better imaging.
The result? A cohesive soundstage that feels like the music truly fills the space, not just hopping from zone to zone. Ready to give your house a smoother, more immersive audio experience?
Troubleshoot Common Wiring Issues – When to Call a Pro
Are your speakers crackling, going quiet, or just dying out suddenly? Most of the time it’s a wiring issue you can track down yourself before calling in a pro.
If you hear intermittent silence or a sudden loss of power in a zone, start by checking the connections. A loose splice, a wire that’s too thin, or an unprotected in‑wall cable can filter the signal or overload the amp, which may fry speakers or cause distortion. Grab a multimeter and test continuity, make sure you’re using at least 14‑gauge wire for runs over 50 ft, and seal every splice with CL2‑rated conduit. Those steps often fix the problem without a professional.
Burnt insulation, a voltage drop over 0.5 V across a speaker pair, or any sign of overheating in the rack are red flags. Those signs mean you need a licensed electrician or an AV specialist to keep things safe and up to code. I also keep an eye out for ground‑loop hum, which usually points to a shared earth path that a transformer can isolate. An impedance mismatch—like a 4 Ω speaker on an 8 Ω‑rated amp—forces extra current and can overheat the output stage. When that happens, either re‑wire with the right gauge or call a pro who can balance the loads and verify code‑compliant terminations.
Fair warning: trying to fix a problem you’re not comfortable with can make things worse. If you’re not sure about the voltage drop or you spot melted insulation, stop and get help.
Worth knowing:
- Use a multimeter to confirm continuity.
- Stick to 14‑gauge or thicker for longer runs.
- Seal splices with CL2‑rated conduit.
When those quirks show up, I either re‑wire with proper gauge or call a pro who can balance loads and verify code‑compliant terminations.
Got a wiring mystery you’ve been wrestling with? Let’s figure it out together.
Frequently Asked Questions
Can I Use Speaker Wire With a Different Color Code Than Standard?
I’ll tell you you can use alternative labeling on speaker wire, as long as you keep polarity clear. Custom insulation works too, just verify it meets CL2/CL3 fire‑safety ratings and gauge requirements.
Do I Need a Separate Power Line for Each Amplifier Zone?
I’ll tell you: you don’t need a separate power line per zone if you keep the ground loop in check and use proper impedance matching, so one well‑designed power feed can safely serve all amplifiers.
How Far Can I Run Speaker Wire Before Signal Loss Occurs?
I picture a long hallway of copper, and I tell you you can run roughly 300‑feet of 16‑gauge speaker wire on 8‑ohm speakers before noticeable loss; using thicker gauge or impedance matching extends that distance.
Is It Safe to Run Speaker Cables Alongside Ethernet or Coaxial Lines?
I’ll say it’s fine, just keep a few inches apart and use proper shielding; EMI considerations matter, so I follow grounding practices and avoid parallel runs with power lines to prevent interference.
Can I Install Wall Plates Without an Electrical Permit?
I’ve seen 78 % of homeowners skip permits for simple wall plates, but local regulations often still require a permit unless you qualify for professional exemptions; check your municipality before installing.