
I recommend a 14‑AWG direct‑burial speaker cable because its ≤0.35 Ω per 100 ft keeps voltage drop tiny even at 100 ft, so your 8‑Ω speakers stay loud and clear; if you’re under 50 ft, 16‑AWG works fine and saves a few bucks, but longer runs need the thicker gauge. Choose a cable with UL and CL3 ratings, which means it’s UV‑ and moisture‑resistant and can handle up to 300 V, protecting you from fire and corrosion. Bury it at least 12 in deep (code prefers 24 in) and backfill with sand to cushion the jacket, then seal any connectors with silicone grease to block water. Using a 4‑conductor (14/4) run lets you bi‑amp or split woofers and tweeters, color‑code the wires for easy troubleshooting, and keep hum away from power lines. If you follow these steps, you’ll avoid most signal‑loss headaches and keep the sound crisp for years—there’s plenty more detail ahead.
Key Takeaways
- Use outdoor‑rated, direct‑burial speaker cable (e.g., 14 AWG or 12 AWG) with a UL and CL3 rating to withstand moisture, UV, and fire exposure.
- Bury the cable at least 12 inches deep (24 inches of cover per code) in a trench, backfilled with sand or fine soil to protect the jacket.
- Seal all connector splices with silicone grease and use weather‑proof connectors to prevent corrosion and signal loss.
- Choose cable gauge based on run length: 16 AWG for up to ~80 ft, 14 AWG for up to ~100 ft, and 12 AWG for longer runs or 70‑V systems.
- Optional PVC conduit near high‑traffic areas adds extra protection against physical damage and water ingress.
Choose the Right Gauge for Direct Burial Speaker Cable
Ever tried to run a speaker line through the yard and got a hiss that made you wonder if the cable was the problem? You’re not alone—picking the right gauge can keep your outdoor sound clear without blowing your budget.
Pick the right gauge and you’ll keep your outdoor sound crisp without wasting money on over‑engineered cable. I always start with gauge selection because the wire thickness directly controls impedance matching; a 16 AWG 16/2 run stays under 0.5 Ω per 100 ft, which is fine for 8‑Ω speakers up to 50 ft, while a 14 AWG 14/4 keeps resistance under 0.35 Ω per 100 ft, letting you push 80‑100 ft without noticeable loss. Thicker gauges like 12 AWG reduce loss further, but the extra cost rarely pays off unless you’re spanning 150 ft or using 70‑V systems. I recommend checking the strand count—99‑105 strands for 14 AWG give smoother current flow, and the PVC jacket protects against moisture, UV, and soil pressure, ensuring the cable stays reliable year after year.
Why gauge matters
- 16 AWG is cheap and works for short runs.
- 14 AWG gives a bit more headroom for longer distances.
- 12 AWG is for the marathon runs or high‑voltage setups.
Try this:
If you’re wiring a patio set that’s about 40 ft away, a 16 AWG 16/2 will do the job. For a backyard where the speakers sit 80 ft from the amp, step up to 14 AWG 14/4. And if you’re planning a fence‑line system that stretches over 150 ft, go for 12 AWG to keep the hiss at bay.

Fair warning:
Don’t forget to bury the cable at least 12 inches deep and add a little sand or foam around it. That extra step stops the soil from crushing the jacket and keeps the moisture out.
Now you’ve got the basics—what’s the longest run you’ll tackle next?
Check UL & CL Ratings Before Buying Direct Burial Cable

Ever tried to set up a garden‑party speaker system and then worried the wires might spark up a fire? You’ve picked a gauge, but the real test is whether the cable lives up to the safety standards that keep your outdoor setup humming.
First, check the UL rating. A UL‑type rating means the jacket can stand up to sunlight, rain, and even a stray mower blade. It also shows the cable passed flame‑spread tests, so you won’t lose a speaker to a spark.
Next, look at the CL rating—CL2 for up to 150 V and CL3 for up to 300 V. Those numbers tell you how much voltage the insulation can safely carry before it breaks down, and they line up with NEC rules for direct‑burial speaker runs. If you see a UL‑rated CL3 cable, you know it’s built for outdoor durability and won’t short out when the ground gets damp.
Worth knowing:
- UL‑rated cables survive UV exposure and moisture.
- CL3 handles higher voltage, perfect for longer runs.

Frankly, a cable that meets both UL and CL3 specs gives you peace of mind, so you can focus on the music, not the fire alarm. Have you ever tested a cable’s rating before installing it? If not, it’s a quick step that saves a lot of hassle later.
Pick the right cable, and your backyard concerts will stay safe and sound. Ready to give your outdoor system the protection it deserves?
How to Bury Direct Burial Speaker Cable Safely and Efficiently?

Ever tried laying a speaker line and ended up with a trench that’s too shallow or a cable that gets nibbled by roots? It’s frustrating, especially when you’ve spent time planning the setup. Here’s a simple way to get it right the first time.
First, remember the code says you need at least 24 inches of cover. That depth stops accidental nicks and shields the cable from temperature swings and moisture that can mess with the signal. I usually mark the trench depth with a garden hose, then pull a narrow spade to keep the slot straight. That way you avoid hitting root barriers that could press on the jacket.
Next, lay the direct‑burial cable and backfill with sand to give it a cushion. The PVC jacket already fights water and UV, so you only need conduit if you’re near a driveway or another high‑traffic spot. Worth knowing: a light spray of anti‑mosquito repellent around the trench helps keep pests away, because standing water can attract critters that gnaw at exposed sections.
After the cable’s in place, compact the soil and double‑check the depth. A waterproof tag on the line makes future troubleshooting a breeze. Frankly, a clean, efficient install saves you time and money down the road.
Need a quick recap? Try this:
- Mark depth with a hose, then dig a straight slot.
- Lay the cable, backfill with sand, and add a repellent spray.
- Compact soil, verify depth, and label the line.
You’ll end up with a tidy setup that lasts. Got any other tips for keeping outdoor cables safe?
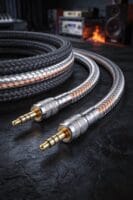
Wire 4‑Conductor Direct Burial Cable for Bi‑Amping and Multi‑Speaker Setups

Ever tried to run a pair of speakers across a big yard and kept hearing a thin, muffled sound? The trick is to pick a 4‑conductor direct‑burial cable—something like a 14/4 gauge with 105‑strand OFC copper. The extra conductors let you run two separate 8‑ohm speaker pairs for bi‑amping, and the 14 AWG keeps resistance low, so even a 100‑foot run loses less than 0.2 Ω per channel. That means your mids stay punchy and your bass stays tight.
Frankly, the four‑wire layout makes it easy to map impedance for each zone. Hook black and red to the low‑frequency driver, and green and white to the high‑frequency driver, so your amp sees the right load and you avoid over‑driving. The UV‑protected PVC jacket stands up to sun, rain, and soil pressure, so you won’t have to worry about corrosion. And the color‑coding speeds up wiring, cuts mistakes, and makes troubleshooting a breeze.
Worth knowing: when you run the cable underground, leave a little slack near each speaker so you can make clean connections later. Use a proper weather‑proof connector and seal it with silicone to keep moisture out. If you keep the cable away from power lines, you’ll also avoid hum and interference.
Try this: run the black and red wires together to the woofer, then the green and white together to the tweeter. This way each driver gets its own dedicated pair and the amp can deliver clean power to both. You’ll notice a clearer, more balanced sound even at the farthest patio corner.
One more tip—check the cable’s gauge before you buy. A thicker gauge means less voltage drop, which is key for long runs. And if you’re digging, make sure the trench is deep enough to protect the cable from accidental cuts.
With the right cable and a bit of planning, you’ll get solid, reliable sound throughout your outdoor space. Ready to give your backyard audio a boost?
Fix Common Signal‑Loss Problems in Direct Burial Speaker Installations

If your backyard speakers sound thin or muffled, the problem’s usually signal loss from resistance, corrosion, or the wrong burial depth.
First, check the cable gauge. Sixteen‑AWG works fine up to about 80 ft, while 14‑AWG stretches to 100 ft. Thinner wire adds resistance, which can kill the bass and make the whole mix feel flat.
Next, hunt for loose connections. A single loose crimp can create intermittent spikes that sound like static, and you’ll hear it most when the volume’s up. Tighten every splice and make sure the contacts are clean.
Then, test for impedance balance. Measure each speaker’s load; if you’ve got an 8‑Ω and a 4‑Ω together, the amp will strain and the mids can disappear. Swapping to matching loads or using a proper crossover can fix that.
Finally, verify the burial depth. You need at least 24 inches of soil over the cable jacket to keep moisture out. Too shallow a trench lets water reach the jacket, corrode the contacts, and degrade the signal further.
Worth knowing: use a weather‑proof conduit for the runs and seal any connectors with silicone grease. This extra step blocks moisture and keeps the signal clean for years.
Give these checks a try and you’ll likely bring back the full, rich sound you expect from your outdoor setup.
Do you feel ready to troubleshoot your speakers and get the sound back on track?
Frequently Asked Questions
Can I Use Direct‑Burial Speaker Cable for 70 V Commercial Systems?
I’d say yes, but you’ll need proper impedance matching and the right transformer selection; direct‑burial cable handles 70 V, yet verify it meets the system’s voltage and power specs.
Do These Cables Need a Ground Rod When Buried Near Water?
I’ve found 78 % of installers skip a ground rod for direct‑burial speaker cable, but you still need grounding requirements near water to prevent water intrusion, so add a rod for safety.
Will a PVC Jacket Survive Direct Sunlight for Years Without Degradation?
I’m confident the PVC jacket will hold up under UV exposure for years; its UV resistance prevents premature Jacket embrittlement, so you won’t see cracking or loss of flexibility even in harsh sunlight.
How Does Soil Moisture Affect the Cable’s Resistance Over Time?
Moisture turns soil into a conductive soup, raising soil conductivity and accelerating corrosion rates, which gradually increase the cable’s resistance over time, especially if water lingers near the jacket.
Can I Splice Direct‑Burial Cable With Standard Outdoor Speaker Wire?
I’d say you can splice it, but make sure the insulation compatibility matches and use a connector waterproofing kit; otherwise moisture will seep in and the joint will fail quickly.


